The rise of digital wallets has transformed the way people shop , offering convenience and incentives that drive customer loyalty. Loyalty programs have become a powerful tool for businesses to attract new clients and boost repeat business. In this article , we will explore how to configure and create attractive features like gift cards, loyalty cards , and e – wallets using Odoo 16, a versatile business management platform.
Configuring Gift Cards , Loyalty Cards , and e – Wallets with Odoo eCommerce
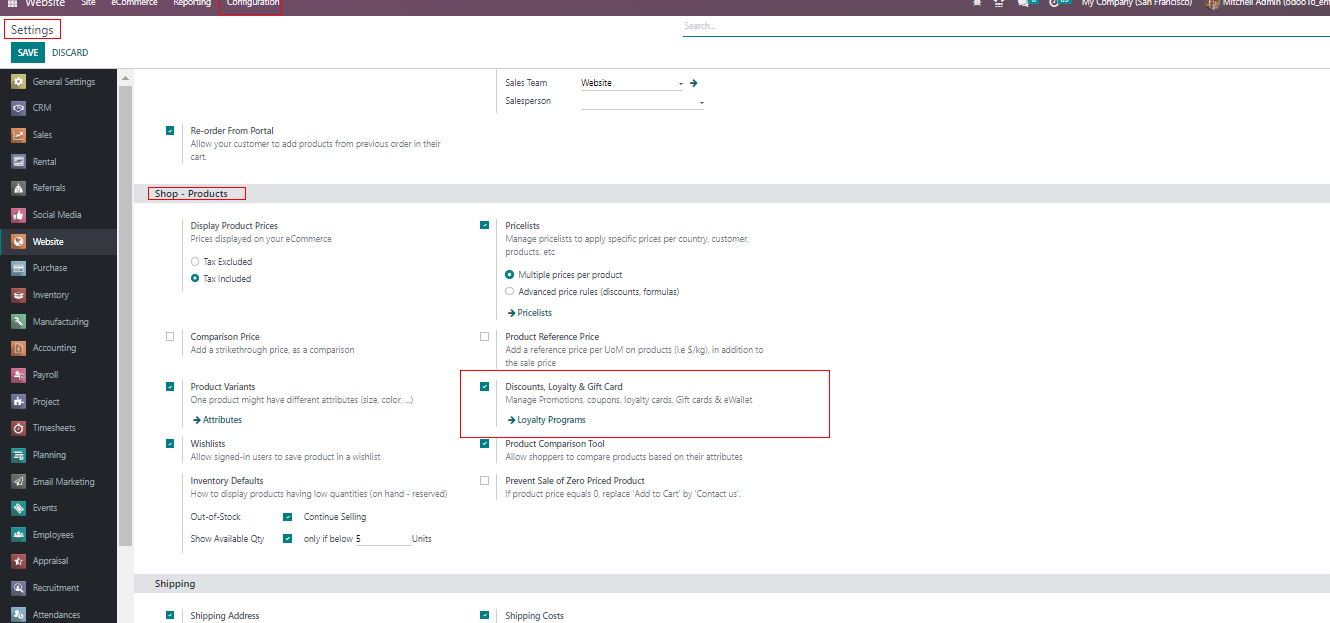
The Odoo system seamlessly integrates Gift cards , Loyalty Cards , and E – Wallets with eCommerce stores, attracting more clients to the business. To access and configure these features, simply navigate to the Configuration tab of the Odoo website module. Within the Settings section , you will find various tabs like Website info, Shop – Payment , Shop – Checkouts Process , Shop – Product , and Shipping.
To manage Promotions, coupons, loyalty cards, Gift cards & eWallets, head to the “Shop-Products” settings tab, as shown in the screenshot below.
Navigating to the “Loyalty Programs” link will take you to a dashboard page displaying pre-configured discounts and loyalty programs. These programs are arranged in a list view, showcasing details such as Program Name, Program Type, Items, Website, Point of Sale, and Company.
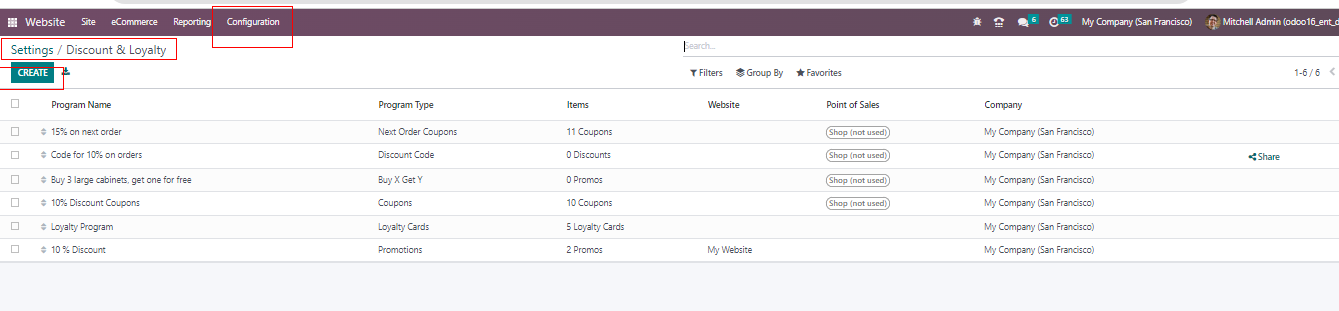
To create a new Discount or Loyalty program, simply click on the “NEW” button. Opening any of the dashboard items will lead you to the corresponding program configuration form, as depicted below.
The configuration form allows you to access specific information about the discount/loyalty program and manage or make changes as needed. Administrative users also have the option to generate additional coupons by clicking the “GENERATE COUPONS” button located at the top left corner of the form. To check the number of available coupons, you can click on the “Coupons” smart button on the right side of the form. In the detailed session that follows, we will discuss how to create new gift cards, loyalty cards, and e-wallets.
Creating Loyalty Programs
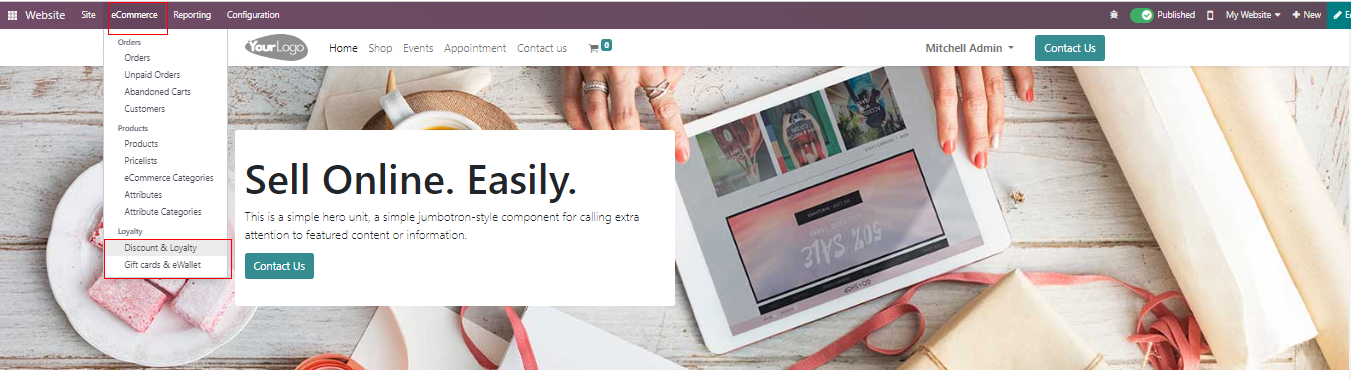
To create loyalty programs, users can access the Loyalty section found in the Ecommerce menu on the website platform. The “Loyalty” section offers two options: “Discount & Loyalty” and “Gift Cards & eWallets.”

Creating New Discount & Loyalty Programs in Odoo 16
By choosing the “Discount & Loyalty” option, a new configuration form will be displayed, as depicted below.

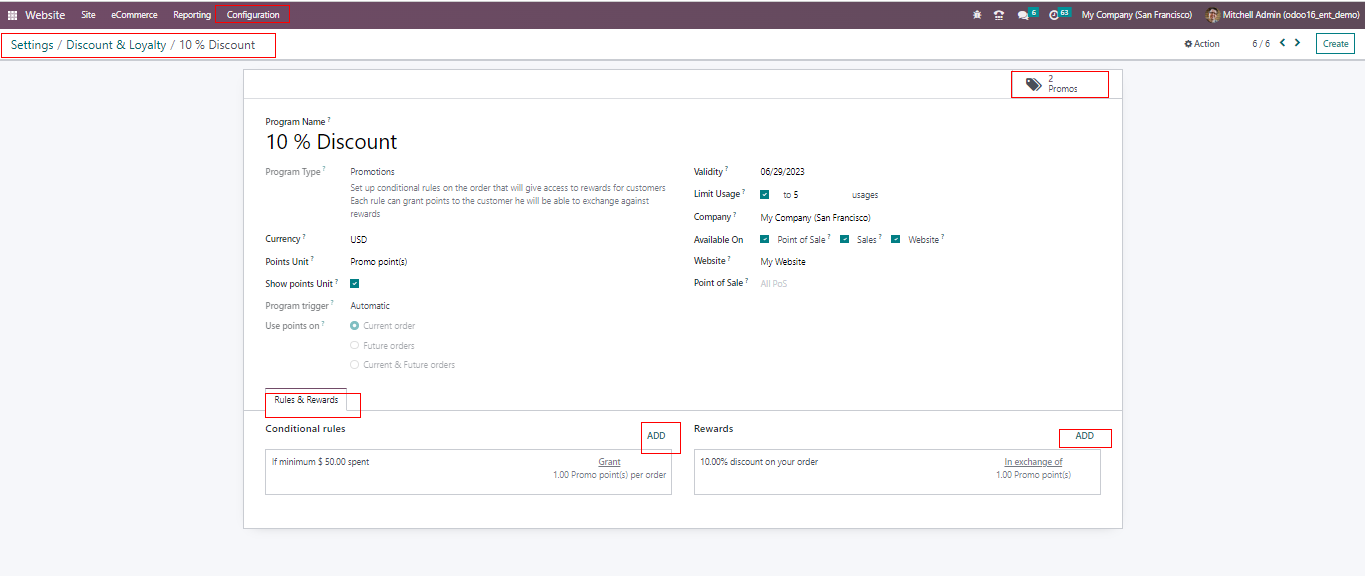
When configuring Discount & Loyalty Programs in Odoo 16, start by updating the name of the program in the Program Name column. Next , specify the program type from options like Coupon , Promotion , Loyalty Card, Buy X and Get Y , Discount Code, etc. In the dropdown menu.Choose the desired currency from the Currency area and set the program’s validity by selecting start and end dates from the Currency area and set the Program’s validity by selecting start and end dates on the calendar provided in the Validity line. To control program usage , define in the Limit Usage field.
Incorporate your business details in the Company area. Tailor access points for loyalty programs by selecting options such as Point of Sale, Sales , and Website in the Available Options section. By entering the relevant website name in the Website field. You can limit program publishing to specific websites. Additionally , you can restrict program visibility to certain shops by specifying their names in the Point Of Sales area. Following these steps, you can effortlessly set up and manage your discount and loyalty programs in Odoo 16, customizing them to suit your business requirements.
Create Conditional Rules
In the “Conditional Rules” section, you have the ability to establish specific rules and conditions for the offer program. By clicking the “ADD” button, you can set purchase or sales conditions that will govern the program’s eligibility. This action opens a new condition configuration popup window, as shown in the screenshot below. Here, you can define the criteria for the program, such as minimum purchase quantity, maximum purchase amount, and product-related conditions like specific products, categories, or product tags. These conditional rules play a crucial role in determining the applicability of the discount or loyalty program to the customers’ transactions.
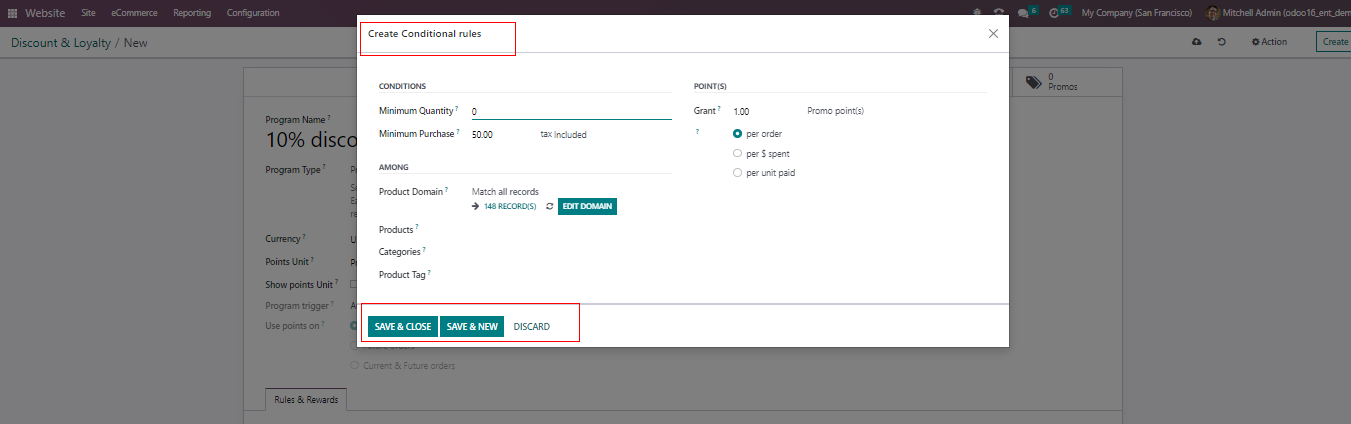
Within the Condition configuration popup window, you have the flexibility to set conditions for the number of eligible coupons or gift cards in the Minimum Quantity area. Additionally , you can specify the Maximum Purchase amount that customers need to reach to avail of the program benefits. Moreover , you can include specific Products , Categories , or Products Tags under the Loyalty Program rule to further define the program’s scope. To save the configured conditional rules, simply use the Save & Close button. Alternatively, you can add a new condition by clicking on the Save & New button, allowing you to create multiple rules for your program.
Create Rewards
When you click on the “ADD” button located under the “REWARDS” section, a popup window named “Create Rewards” will appear, as depicted below. In this window, you can configure new rewards by selecting the “Reward Type” from the dropdown menu. You have the option to set the discount percentage in the “Discount” line and determine whether the reward applies to the entire order, the cheapest product, or a specific product. Additionally, you can specify the “Maximum Discount” provided as an incentive under the “DISCOUNT” tab. The “Description” field allows you to customize the reward’s description. Once you have entered all the relevant information, simply save the rewards by clicking the appropriate button.

In the “Create Rewards” popup window, you have the option to configure new rewards by selecting the desired “Reward Type” from the dropdown menu. Set the discount percentage in the “Discount” line, and choose the appropriate option to apply the discount on the “Order,” “Cheapest Product,” or “Specific Product.” Additionally, you can specify the maximum discount amount provided as an incentive under the “DISCOUNT” tab. Customize the reward description in the “Description” field as needed. Once you have entered all the necessary details, simply save the rewards using the “SAVE & CLOSE” button.
Create Gift Card & E-Wallets
In Odoo 16, a new function is available: a dedicated menu for managing gift cards and eWallets. You can access the eWallet’s functionalities in the new Odoo16 Website module. Go to the “Loyalty” section from the “eCommerce” menu and select the “Gift Cards & eWallets” option. The platform displays a list of gift cards and eWallets together with information about the Program Name, Program Type, Names, Website, Point of sales, and Company, as seen in the image below.

To create a brand-new gift card or e-wallet, simply click on the “NEW” button, which will open a form view as illustrated below. In this form, you can input the necessary details to set up the gift card or e-wallet according to your preferences.
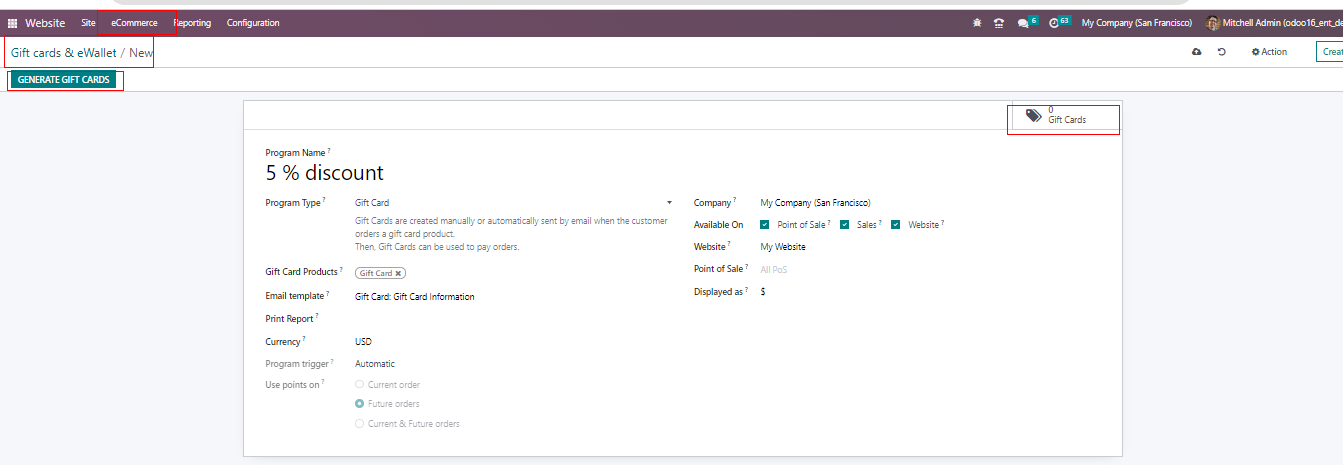
From this view, you can enter the desired Program Name in the respective field.Next , choose the type of program you wish to establish from the options available in the Program Type area, which can be either an ewallet or a gift card.
Gift cards can be prepared and sent either manually or automatically via email when a customer purchases a product that includes a gift card.Customer can then use these gift cards to pay for their orders. The Gift Card Product field allows you to trigger specific product IDs after selecting the Gift Card program type.
To customize the email notification for the gift card, you can upload an email template in the Email Template section. Additionally , you have the option to print the created gift cards from the Point of Sale (POS) by selecting the relevant option under Print Report.
The Currency field enables you to specify the currency used for transactions involving this gift card. After filling in the necessary details, identify the associated Company. By selecting from the available choices and activating the relevant options, you can make this gift card available at the Point of Sales, and Website.
For added flexibility, you can indicate the relevant “Point of Sale” and “Website” in the respective fields. Once all the information is provided, save the data to create the gift card or e-wallet as desired.
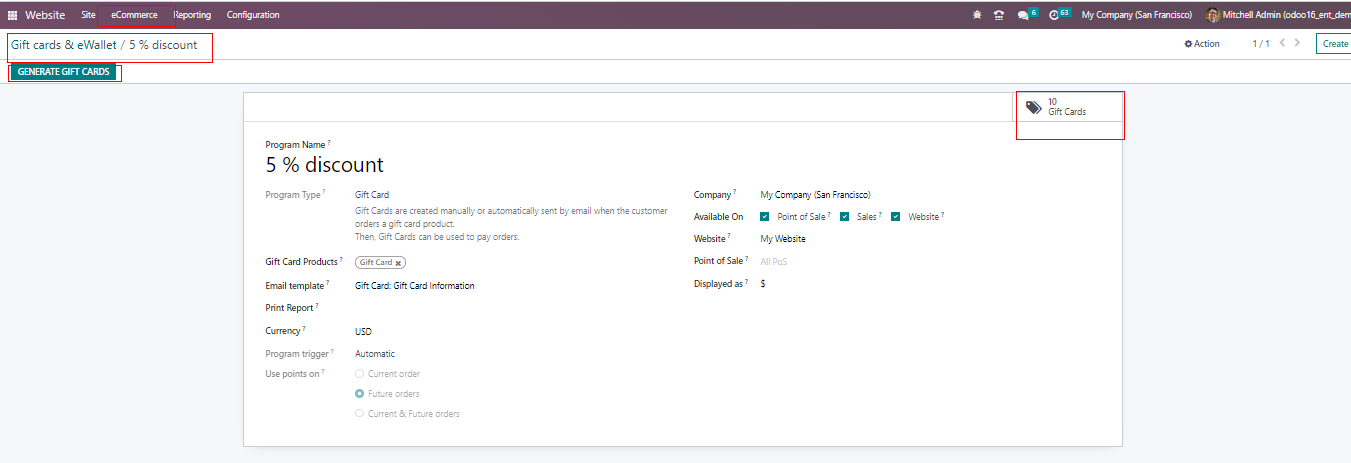
Generate Gift Card
By utilizing the “GENERATE GIFT CARDS” button, you can effortlessly generate the required number of gift cards. Clicking on this button will trigger a popup window, as illustrated below. In this window, you can specify the number of gift cards you wish to create and set the gift card value for each card. Additionally, you can define the validity period for these newly generated gift cards. Once you have entered the necessary details, simply click on the “GENERATE AND SEND GIFT CARD” button to initiate the creation process.
When using the For section , gift cards can be generated for both Selected Customers and Anonymous Customers in Odoo. If you choose to create gift cards for Selected Customers, additional fields for Customers and Customers Tags will appear. In the Quantity to Generate field , you can specify the desired number of gift cards to be created. Furthermore , in the Gift Card Value field, you can mention the points or amount assigned to each gift card.
To set the validity of the newly configured gift cards, simply select a date from the calendar dropdown option in the Valid Until field. After Providing all the necessary details , clicking the Generate and Send Gift Card button will initiate the generation process for the requested number of gift cards.
You can conveniently track the number of available gift cards from the “Gift Cards” smart button, allowing you to stay updated on the status of your gift card inventory.

Clicking on the “Gift Cards” smart button will grant access to the dashboard displaying all the gift cards generated under this loyalty program. This dashboard provides a comprehensive overview of the gift cards’ details and allows for easy management and tracking of the gift card inventory within the program.
All the gift cards are listed and categorized based on the following criteria: gift card code, balance, expiration date, program, and part number. This organization allows for easy access and management of the gift cards, providing a clear overview of their details and status within the system.
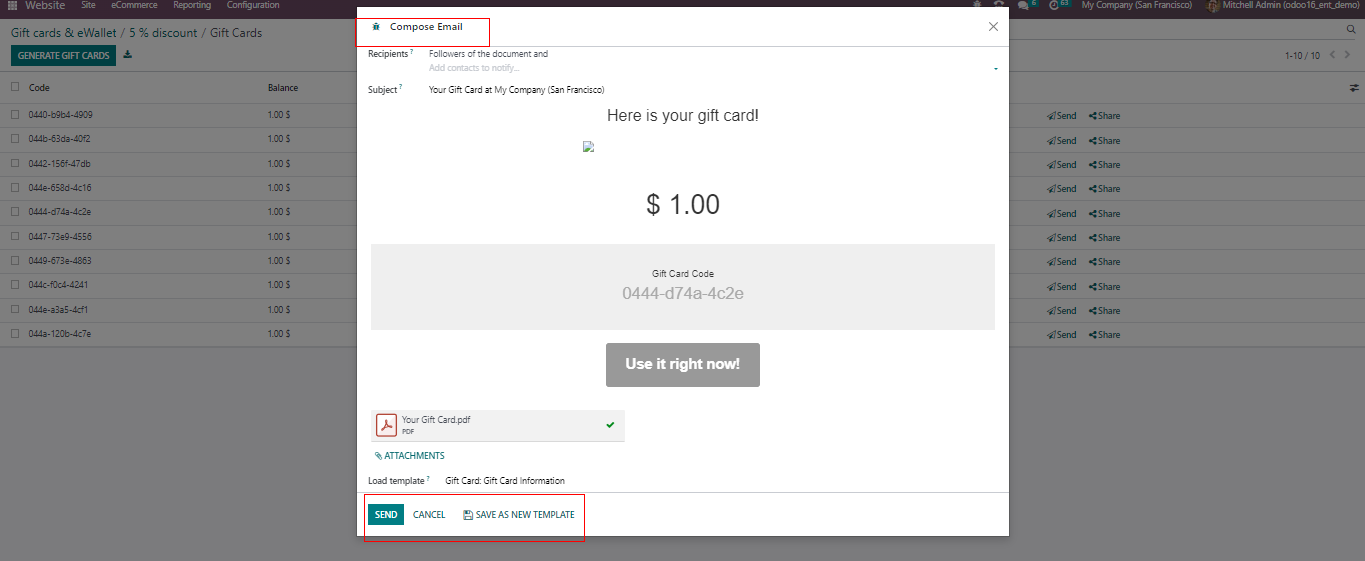
Sending Gift Card
To send the gift cards, administrators can use the “Send” button associated with each gift card field. Clicking this button will open a popup window containing an email body with the gift card details and card code. Admins can edit the email address to ensure the gift card is sent to the correct recipient and then use the “SEND” button to deliver the gift card to the selected contact. This streamlined process enables the seamless distribution of gift cards to customers via email.
Sharing Gift Card
By clicking the “Share” button on the gift card field, you can easily share the gift cards via URL links. This feature allows you to generate shareable links that can be distributed to recipients, allowing them to access and use their gift cards conveniently.
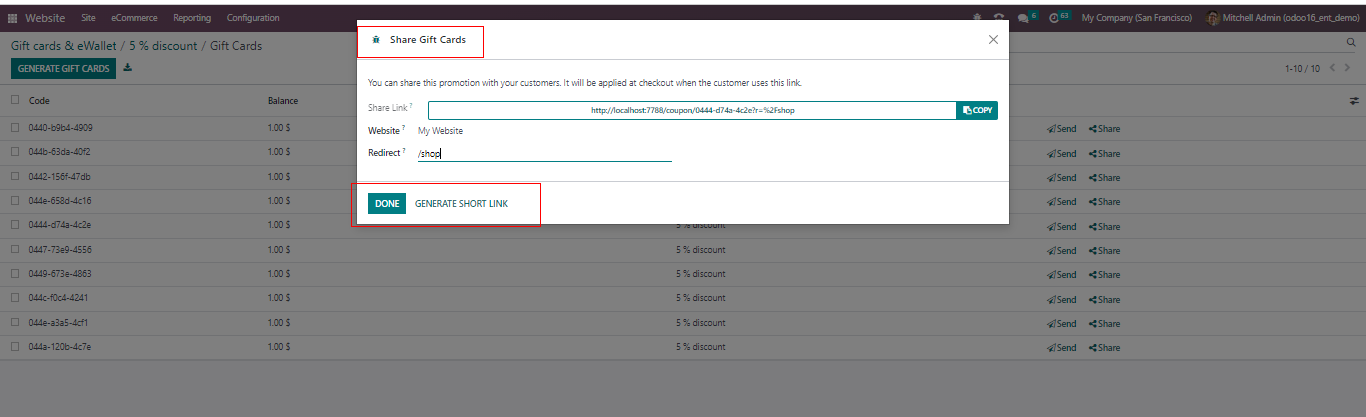
When the website ID is entered in the “Website” field, the gift card becomes shareable specifically on that particular website. This means that the gift card can be made available and accessible for use exclusively on the designated website, providing a targeted and customized gifting experience for customers on that platform.
Creating eWallet
When a consumer places an order for a product associated with an eWallet , the eWallets can be generated either manually or automatically. These eWallets can then be used by customers to conveniently pay for their orders during the checkout process.
To create eWallets, you can follow a similar process as used for gift cards. Simply select the “eWallet” option in the “Program Type” field when setting up the loyalty program. This allows you to configure and offer eWallets to customers as part of your loyalty program, providing them with a seamless and efficient payment method for their purchases.

The process for setting up eWallets is similar to gift cards , with description and fields being nearly identical. To create an eWallet, you need to fill in the required information in corresponding areas such as Program Name , Program Type , and e – Wallet Products. Additionally, provide details for Email Templates , Currency , and the associated Company. You can choose where the eWallet will be available by selecting options from the Available On section. Specify the relevant Website and Point of Sale in their respective fields.
Once all the necessary information is provided, save the eWallet data. To create a new simple click on Generate Ewallet , initiating the process to generate fresh Ewallets for your customers.
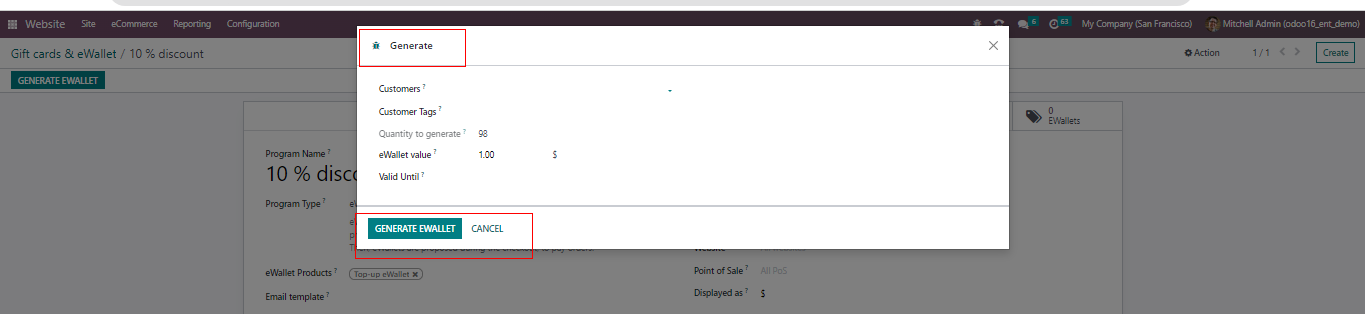
In the eWallet creation process , you have the flexibility to select or edit customer details in the Customer fields.You can also add specific information in the Customer Tags, Quantity to Generate , eWallet Value , and Valid Until option. To generate new eWallets , simply click on the Generate eWallet button.
Additionally , you can conveniently manage the newly created eWalets by using the eWallets smart button , which provides access to view and oversee the eWallets within the loyalty programs.
In summary, the Odoo 16 Website Module empowers business-oriented website owners to effortlessly create specialized offers, exclusive promotions, and other loyalty programs, including gift cards, loyalty cards, and eWallets. With Odoo 16’s user-friendly application platform, businesses can enhance customer engagement and loyalty without any hassle.