Employees are really important for a business. Sometimes , employees use their own money to pay for work – related expenses , like when they go on business trips. In some cases , the company reimburses them for these expenses because they are part of doing business.
To make managing these expenses easier , there is a tool called the Odoo Expense module. This tool helps keep track of expenses accurately and makes it easy for employees to get their expenses approved. It also connects with other important modules like payroll and accounting.
Let’s see how employee expenses are handled using the Expense module.
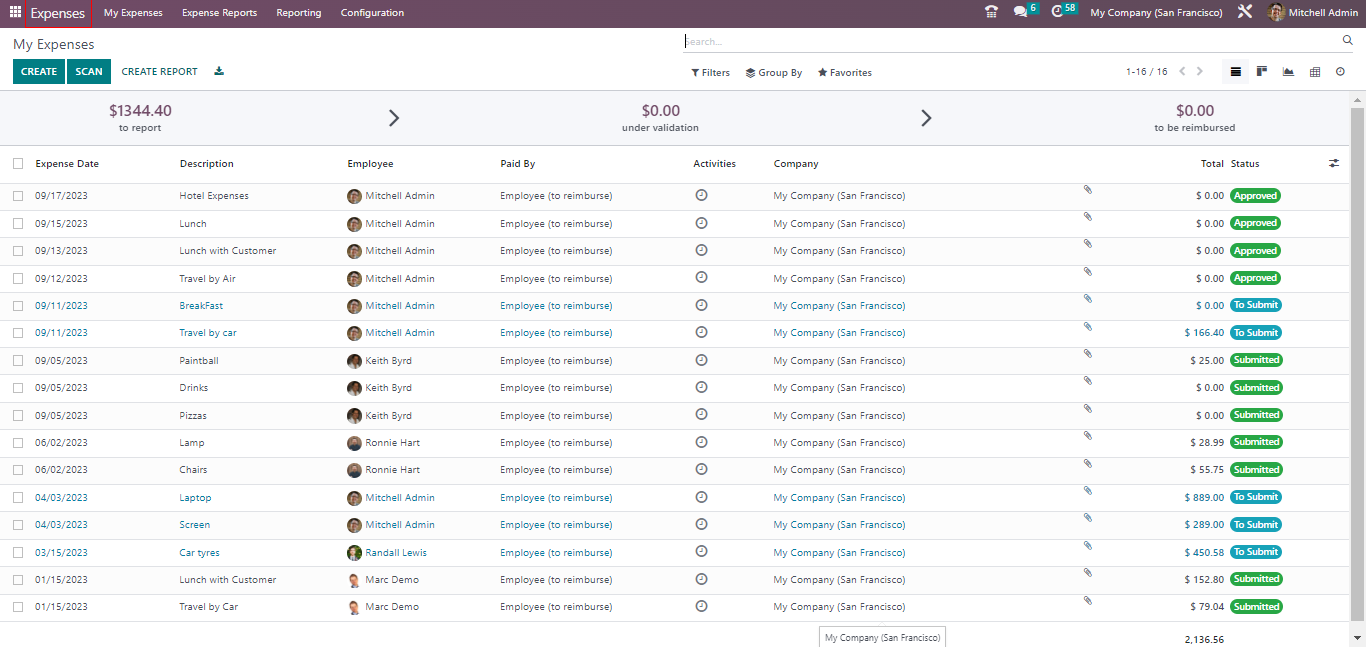
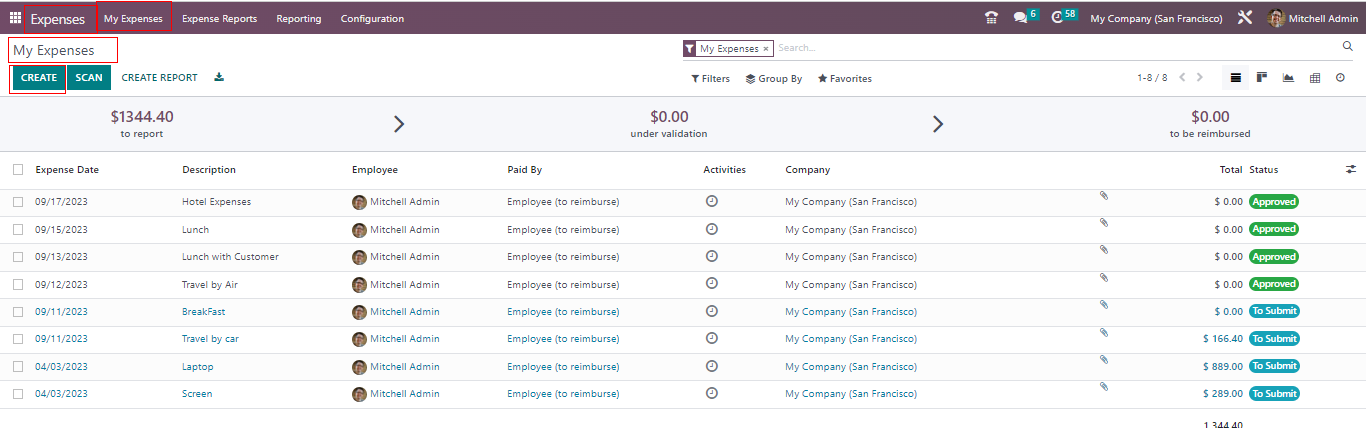
When you open the Expense module , you can see all expenses that a user has created. You can also create a new expense by clicking the New button. Additionally , there is an option to scan a report. You can organize and view expenses using filters , groupings , and mark your favorites . This makes it simple to keep everything organized and track expenses more effectively.
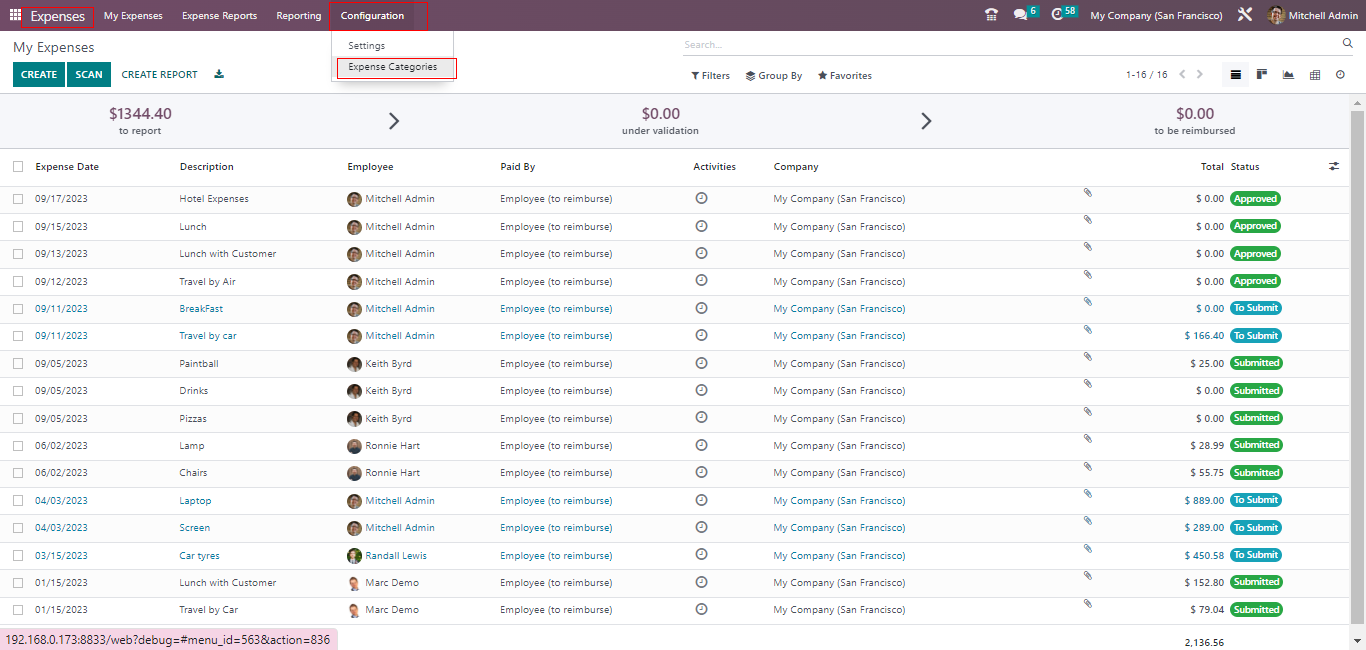
Setting up Expenses Categories
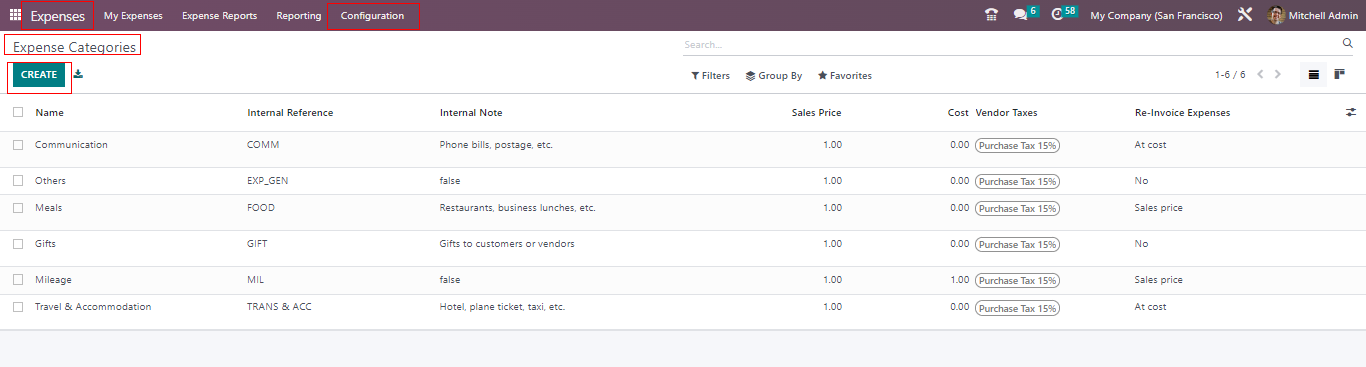
Employees can pick a certain category for their expenses. They can choose from different spending categories like Communication , Gifts , Travel and Accommodation , Others , and more. You can even create new categories if you need them. Just go to the Configuration menu and select Expense Category to add a new one. This helps organize and classify expenses in a way that makes sense for your business.
In this section , you can see a list of all the categories you have created. Each category has a name , an internal reference , and information about its cost and sales price. If you want to make a new category , you can simply click the New button. This way , you can easily keep track of different categories and the details related to them.
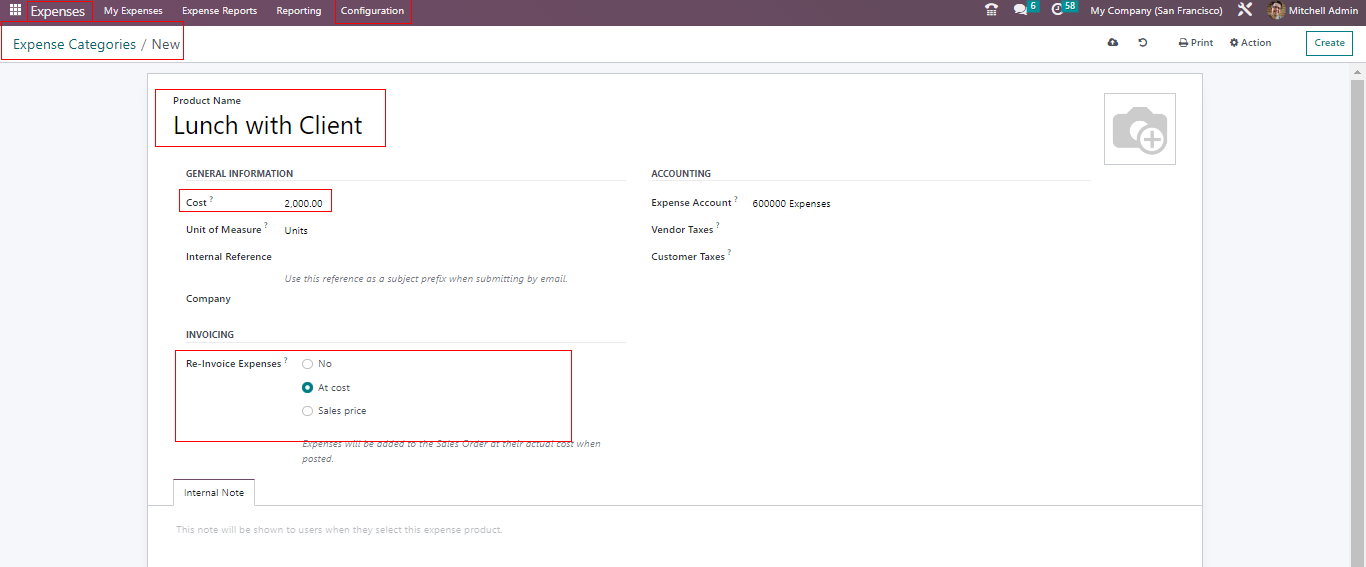
Here is a new product we have made called Lunch with a Client. It has some basic info like how much it costs, what unit of measurement is used , its internal reference , and the company it is associated with.
When it comes to reinvoicing expenses based on the cost , if the cost price is set to anything above zero, then the employee would not be able to change the total expense amount when they are creating the expense. They can only adjust the quantity of the expense product. This helps keep things consistent and prevents employees from altering the expense amount when it is based on the product’s cost.
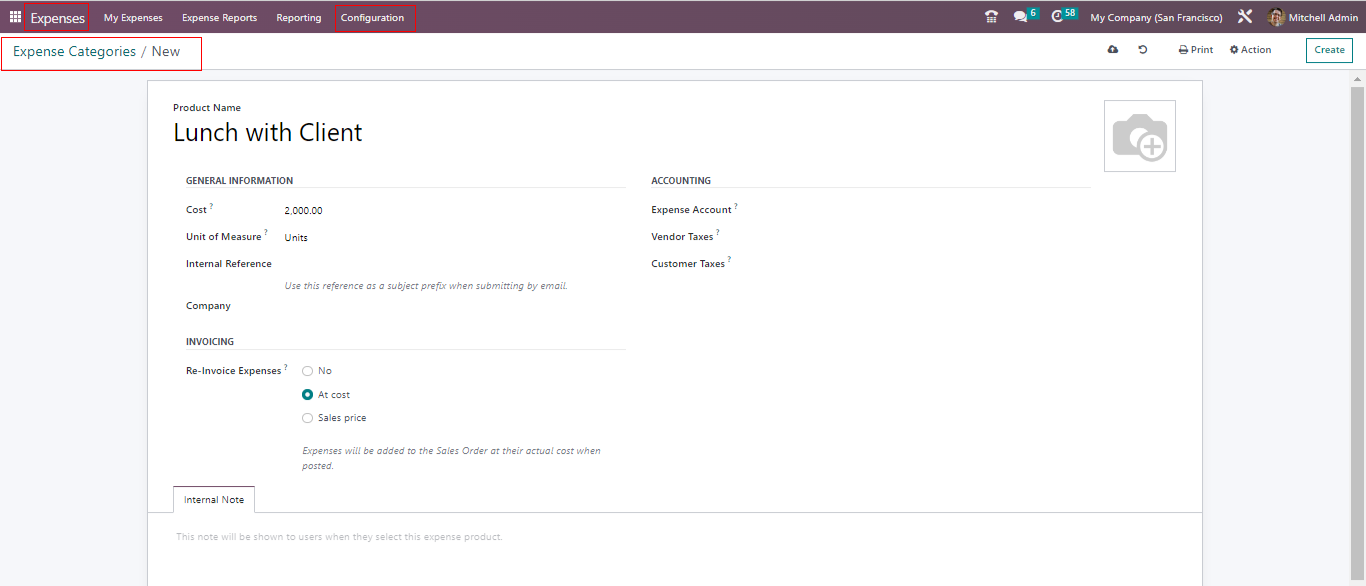
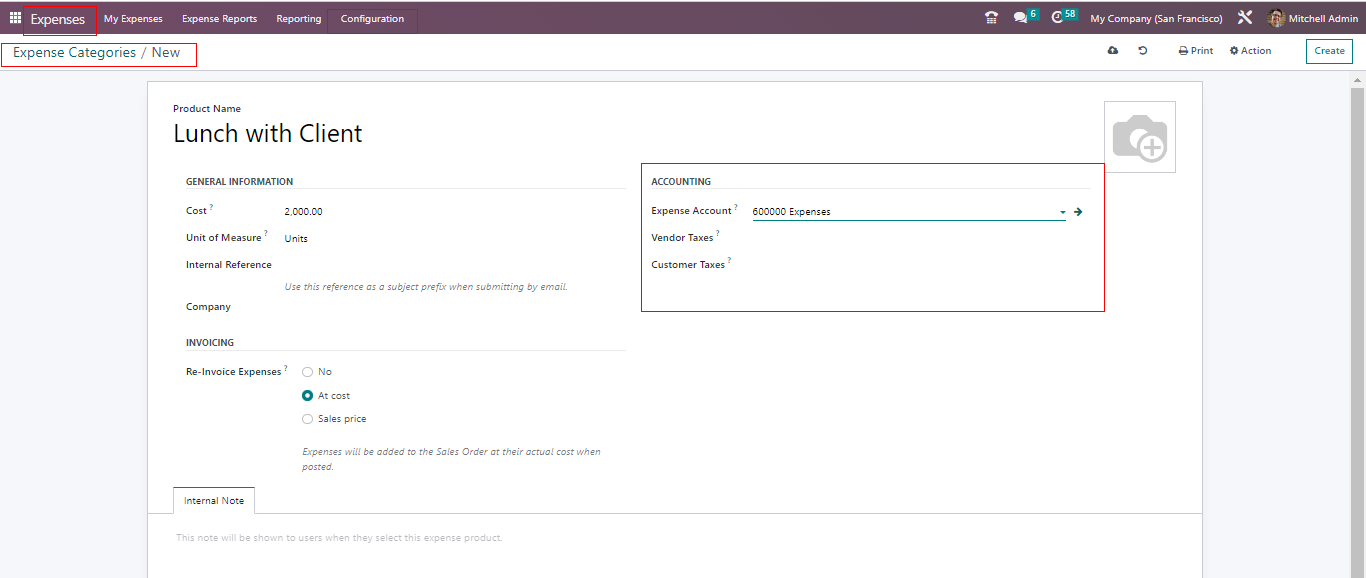
You can include accounting information for the products , such as Expense accounts , Vendor taxes , and Customer taxes. When you provide these details, they will come into play. When you create an expense using this product. However , if you do not specify these details for the product , it will use the accounts mentioned within the product category instead. This way , you can make sure the right financial information is applied to your expenses.
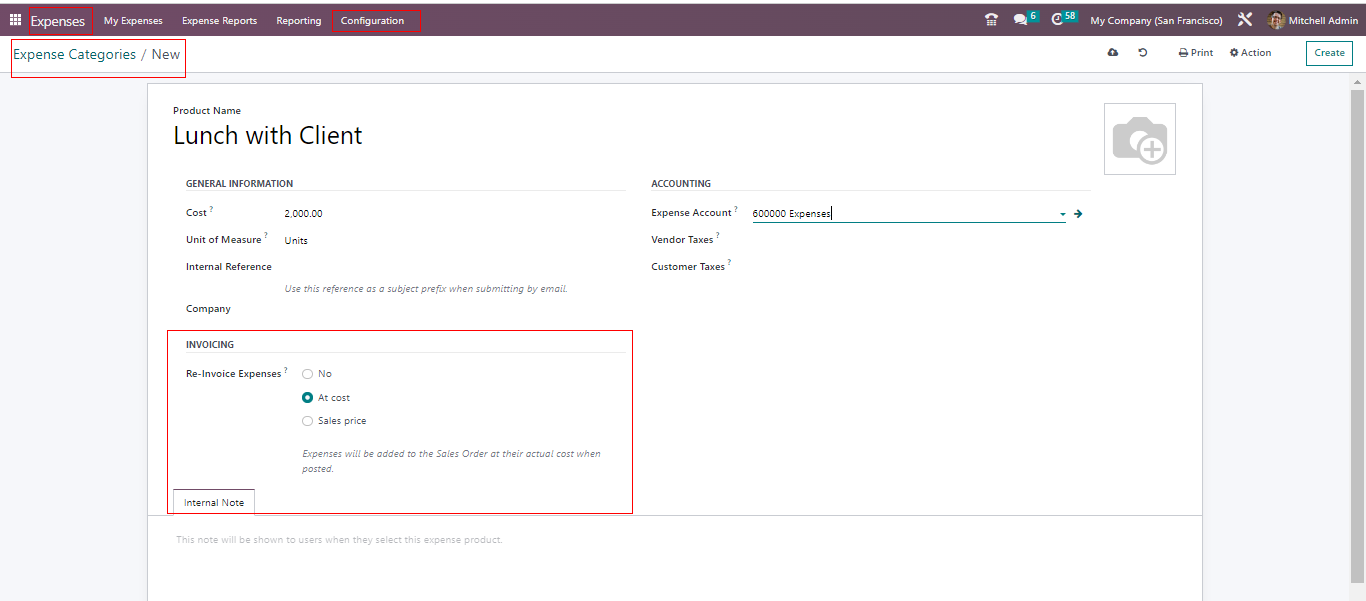
In the invoicing section , you can decide how employees get reimbursed for this product. There are three choices :
No : This means no reimbursement to the employee for this product.
At Cost : Select this if the reimbursement is based on the product’s cost.
Sales Price : If you choose this, an extra field called Sales PRice will appear in the general information. Expenses will be invoiced to the customer at this specified sales price.
You can also add extra notes in the Internal Notes tab to provide more information if needed. This helps in keeping everything clear and organized.
I made a New Category called Lunch with a client for expenses. We will invoice this expense based on its cost, which is set at $2000 . We also assigned an expense account to it. Now I will save this category.
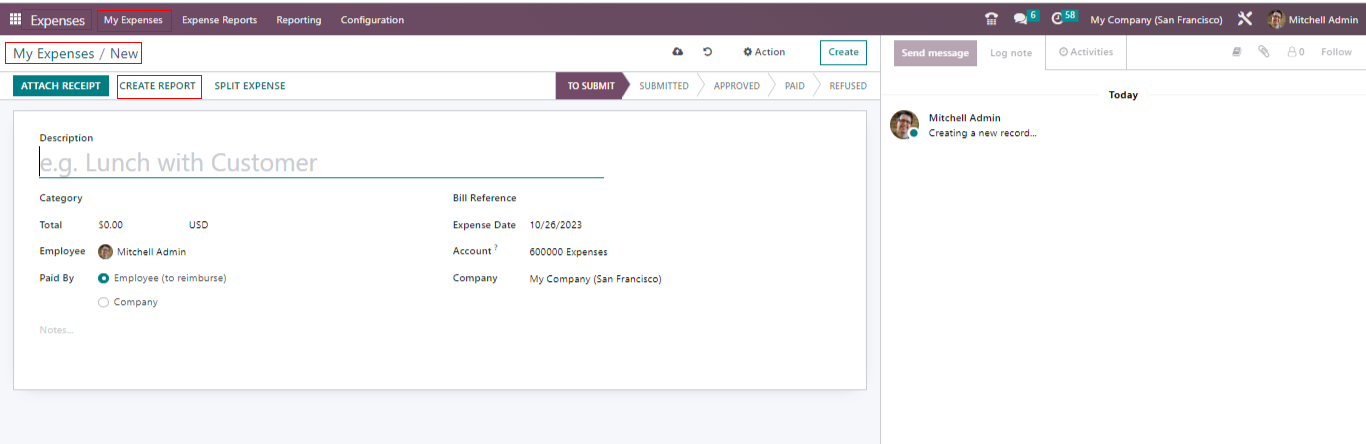
Let’s see how to create an expense. To do this , go to the My Expensee tab. In this section , employees can add a new expense under the category they have set up. To create a new expense , simply click on the New button.
When you are creating an expense , here are the steps :
- Start by adding a description of what the expenses are.
- Then , pick the expense category. Depending on the category , the Total field will update based on the quantity.
- Choose the employee who incurred the expense.
- You can also specify the date when the expense was created and the account where the transaction will be recorded.
- To keep a record , the employee can upload the expense document by clicking the Attach Receipt button. This way , you have proof of the expense.
There are two ways to pay for an expense. The first way is when the employee pays for it, and in such cases , the company will reimburse the employee. The second way is when the company directly pays for the expense.
Case 1 : Paid by Company
Sometimes , The company covers expenses for specific tasks. For instance , if there is a meeting with a client that involves travel , the company pays for the travel expenses. Similarly , the company might also pay for communication expenses like phone bills of postage related to client interactions.
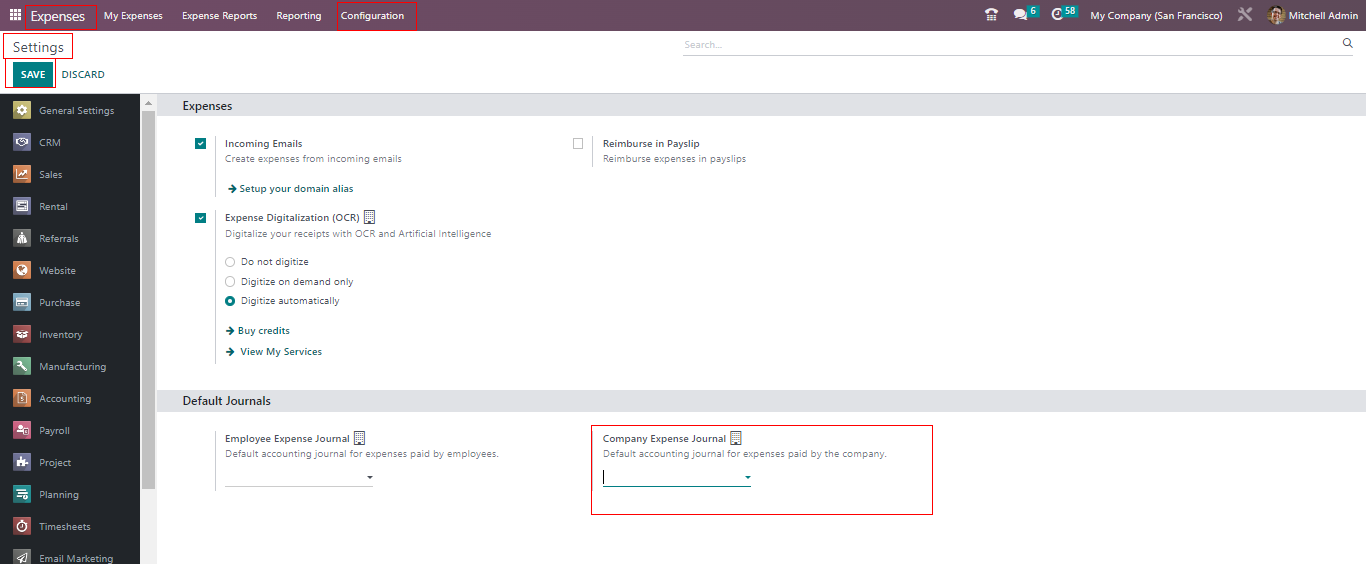
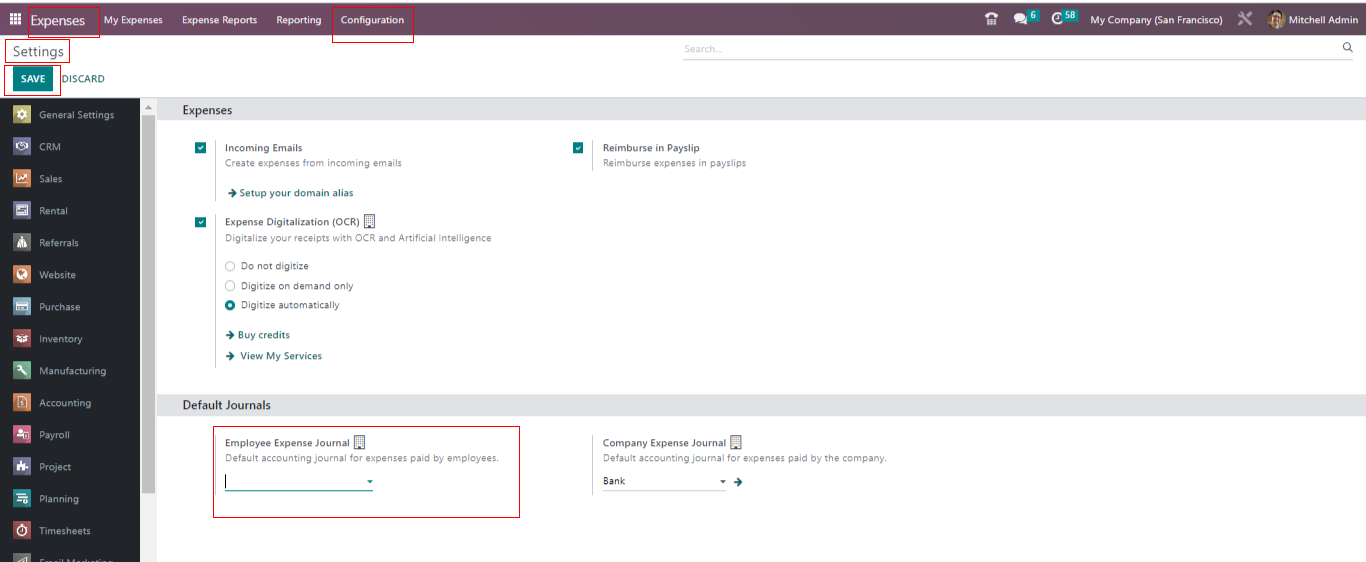
All these transactions where the company covers the expense are reorder in a special journal. You can set this journal by going to This way , you can keep track of all expenses paid directly by the company.
Configuration → Settings → Company Expense Journal → Save .
Let’s take a look at a specific situation. Here , we have an expense created for an employee named Laptop . The expense falls under the Communication category , which means it is money spent by the company for employee Communication with Customers. That’s why , in this case , we choose the Company in the Paid by section.
You can enter the total mount and other details in the expense report. If the company intends to charge this amount to the customer , you can specify the corresponding Sales Order number in the Customer to Re-Invoice field. This way , you keep track of expenses paid by the company for communication with customers , and if needed , you can bill those expenses to the customer.
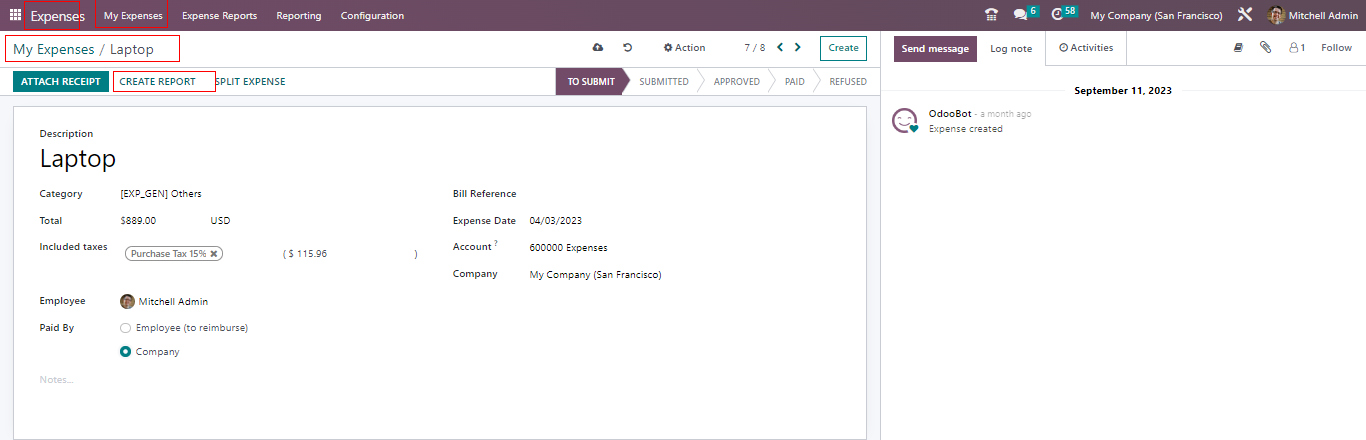
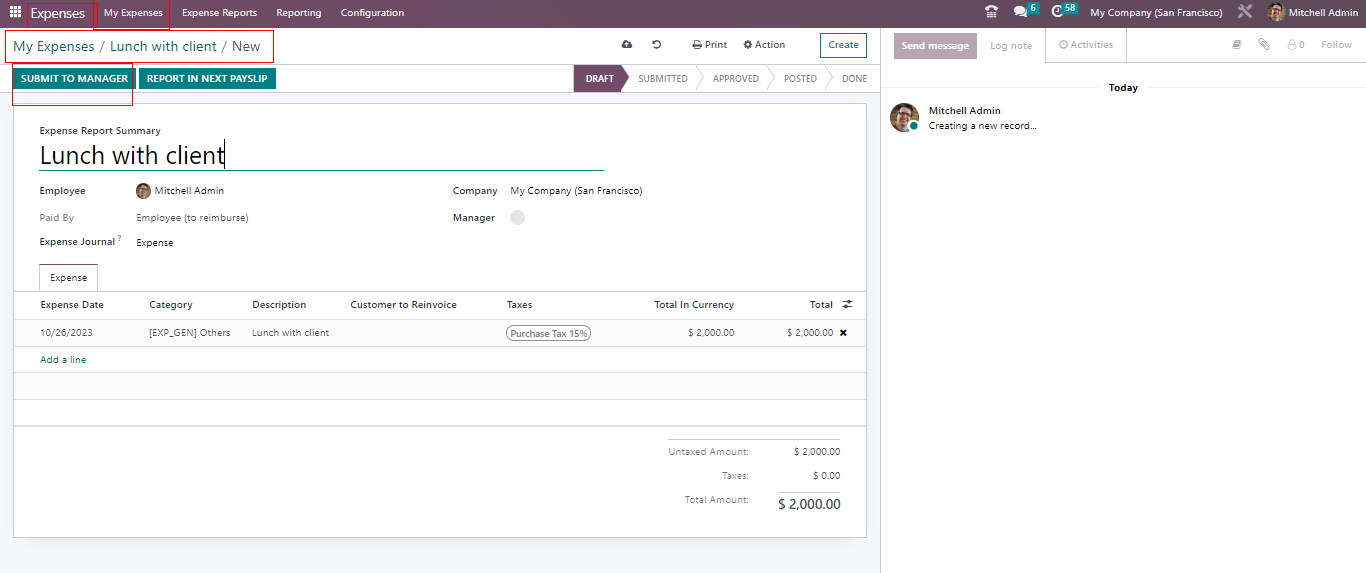
Just like we mentioned earlier , if you have any documents related to the expense , you can attach them using the Attach Receipt button. After that , click on the Create Report button.
This creates an Expense Reports. You can find this report in the My Expense Report section , which you can access from the My Expense tab. It helps you keep all your expenses organized and easy to find.
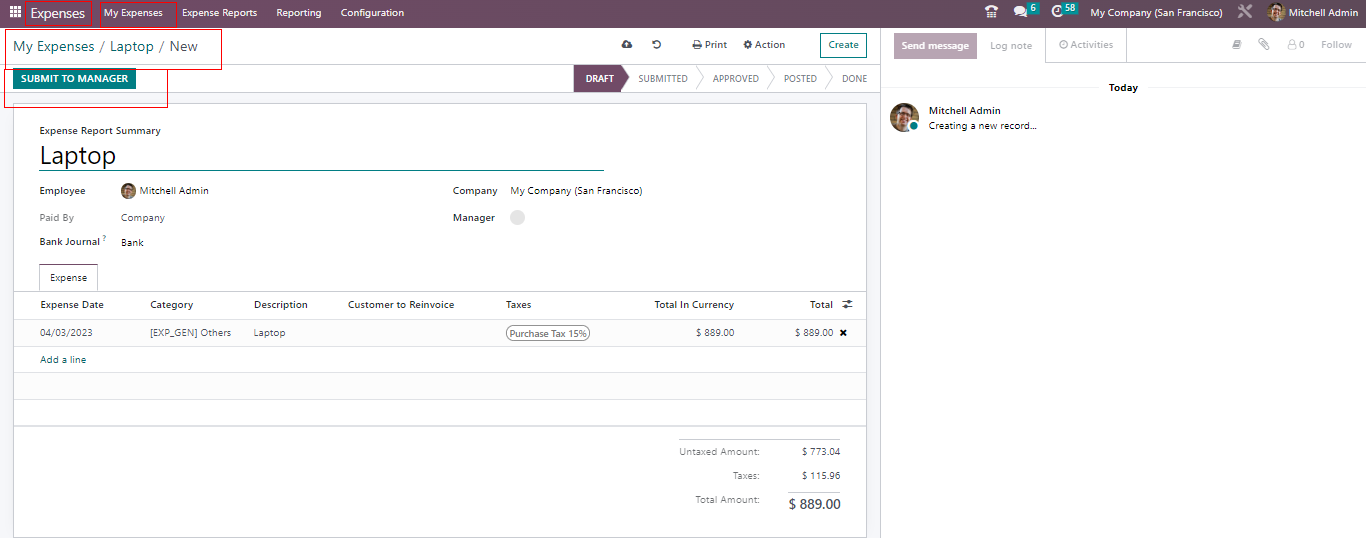
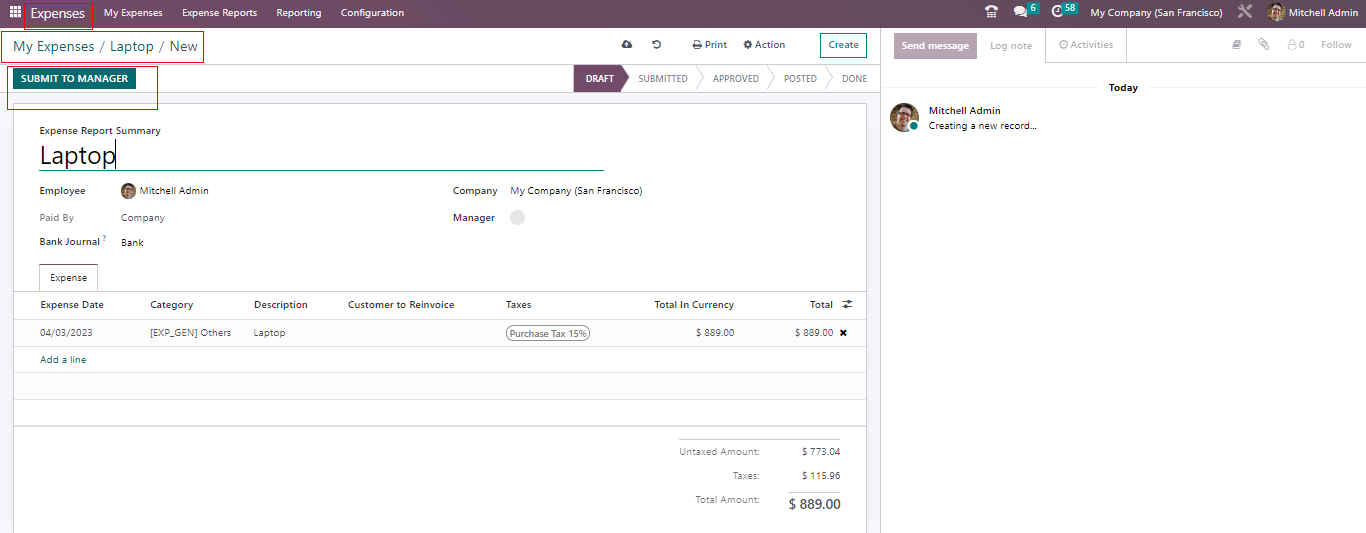
You can send the expense report to your manager for approval by clicking the Submit to Manager button. This is how to let your manager know about the expenses and get their approval.
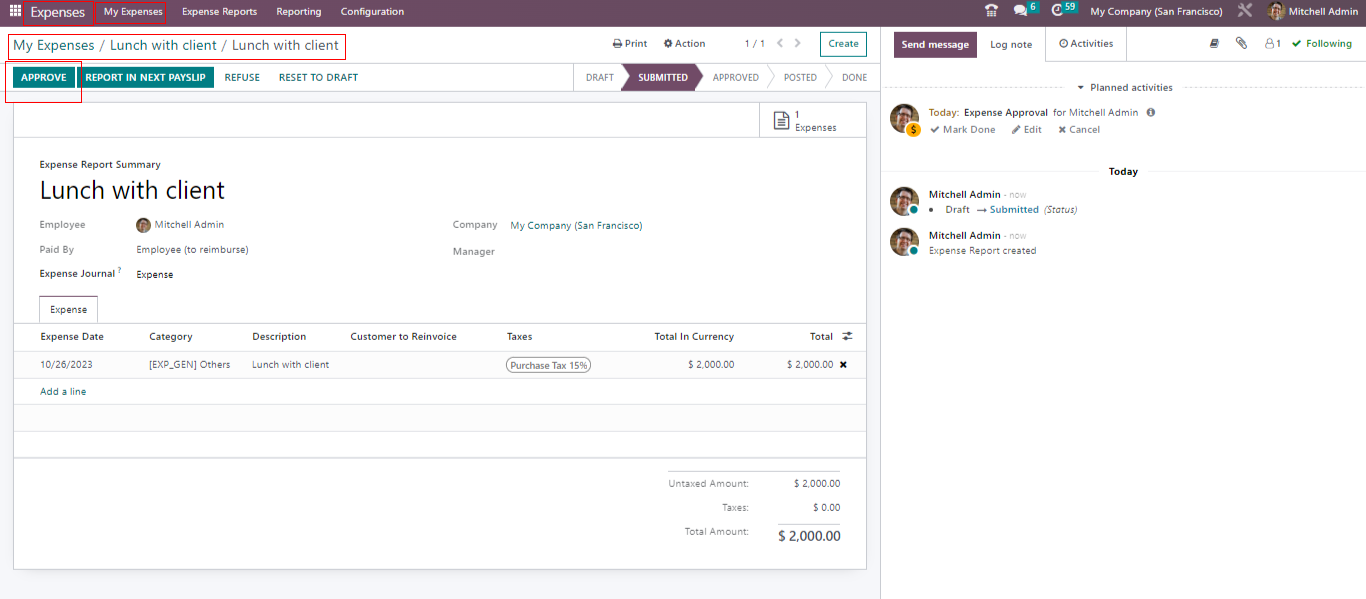
Once you have submitted the expense rapport , your manager will have the option to either approve it or refuse it. They can do this by clicking the Approved or Refuse button. This is how they review and make decisions about the report you have sent for approval .
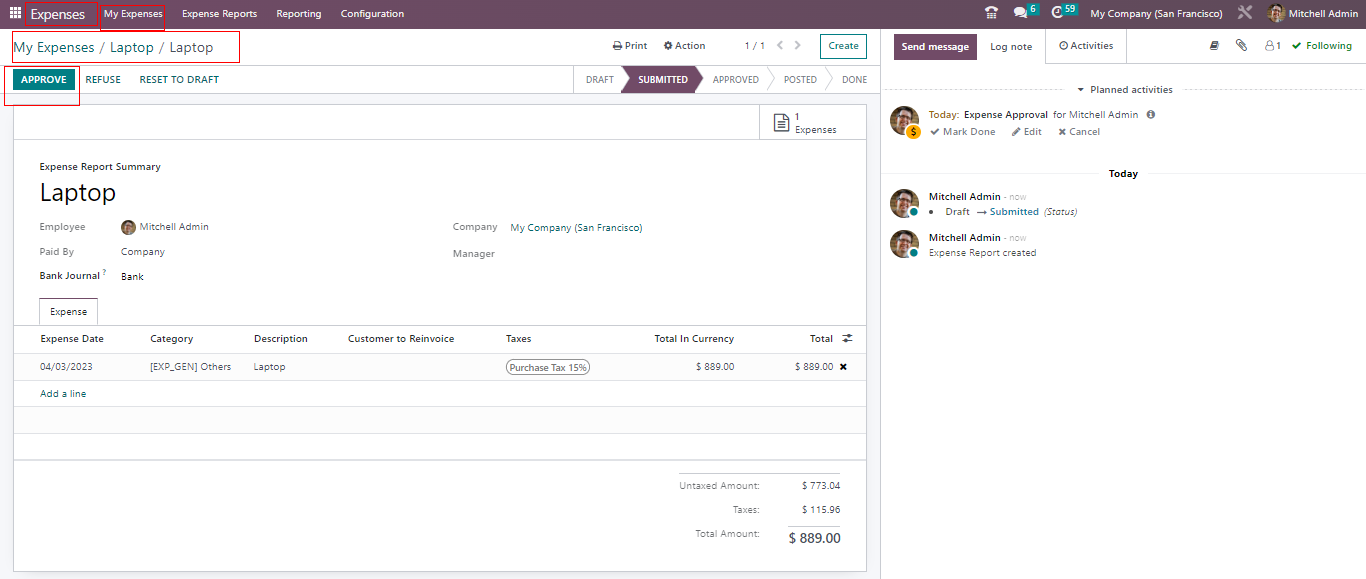
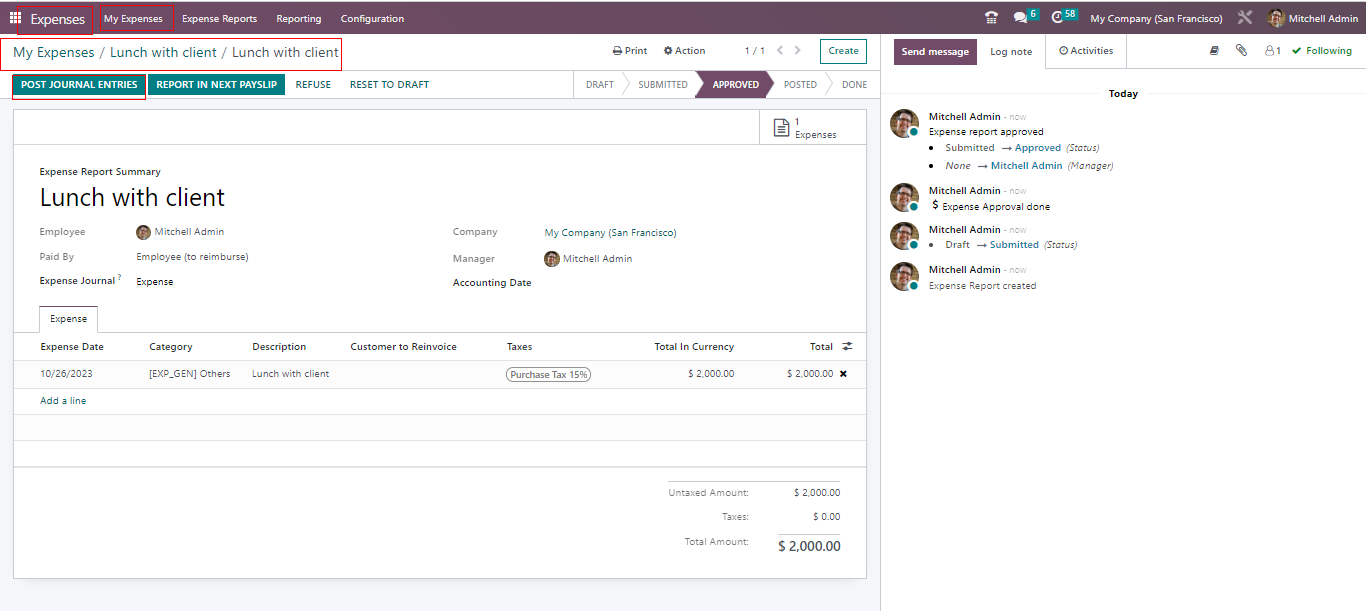
If the manager clicks the Approve button , the repost advances to the Approved stage. At this point , the user is not allowed to post the journal entry to the accounts. This means that the report has been given the green light and can now be officially recorded in the company’s financial records.
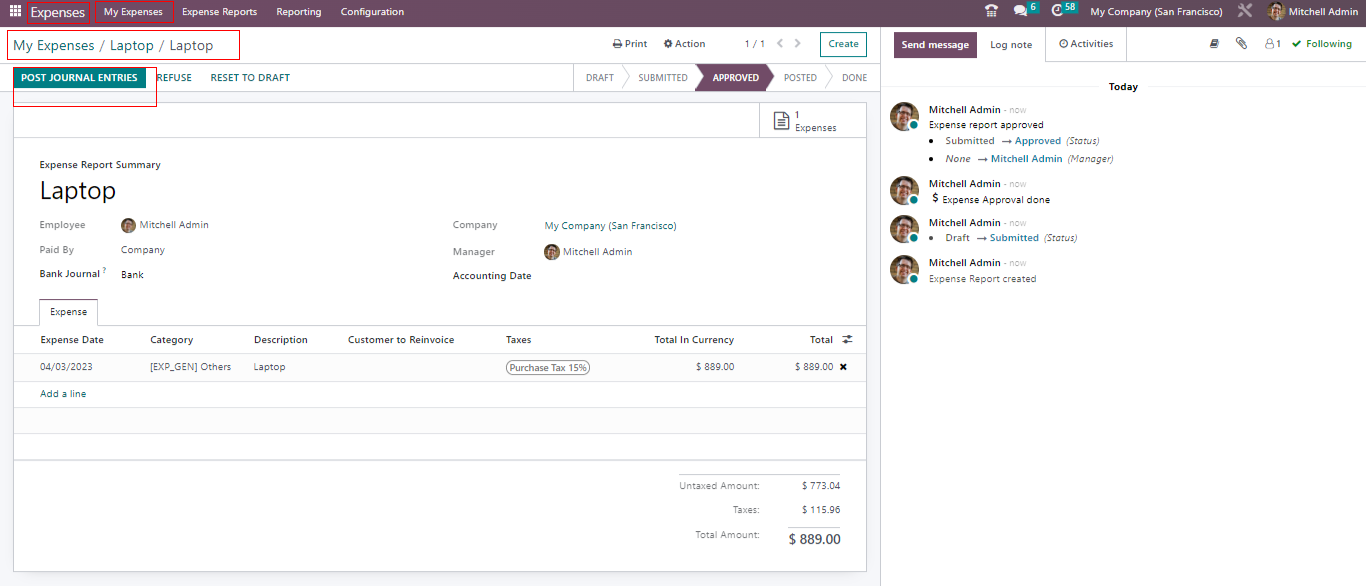
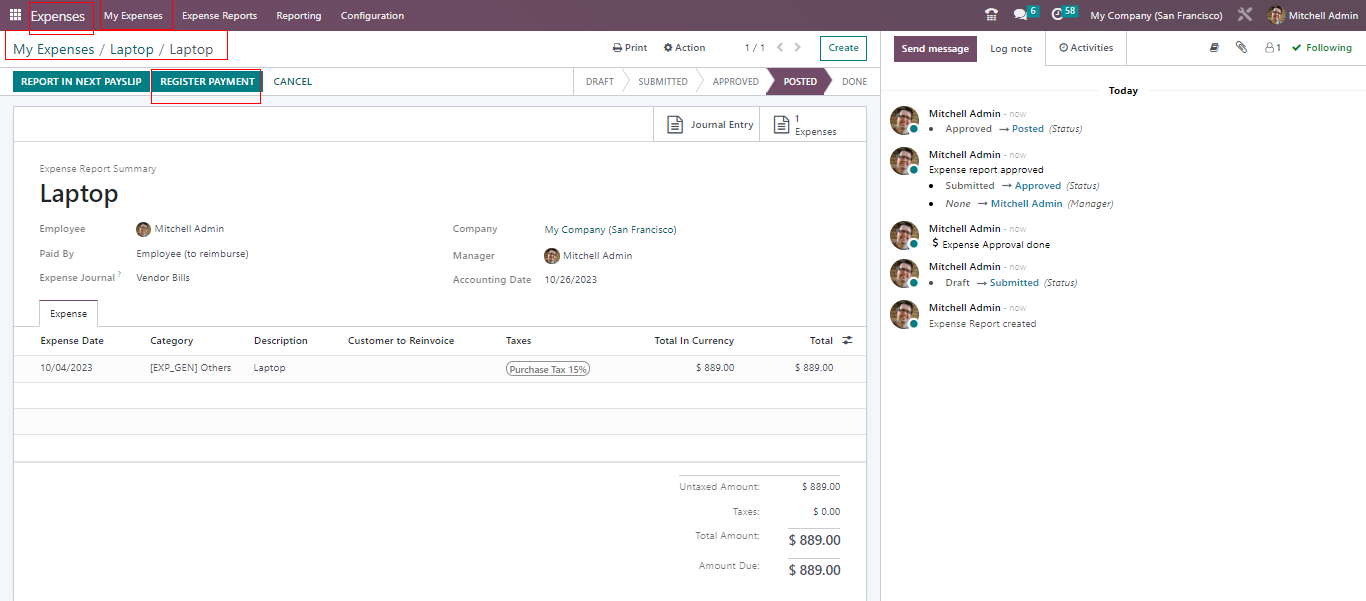
After the report gets approved , it moves to the Posted stage.

At this point , a Posted ribbon automatically appears on the report. In this ribbon , you can see the Bank Journal , which is the same one you set up the configuration settings for . This indicates that the expense has been successfully paid and recorded in the company’s financial records.
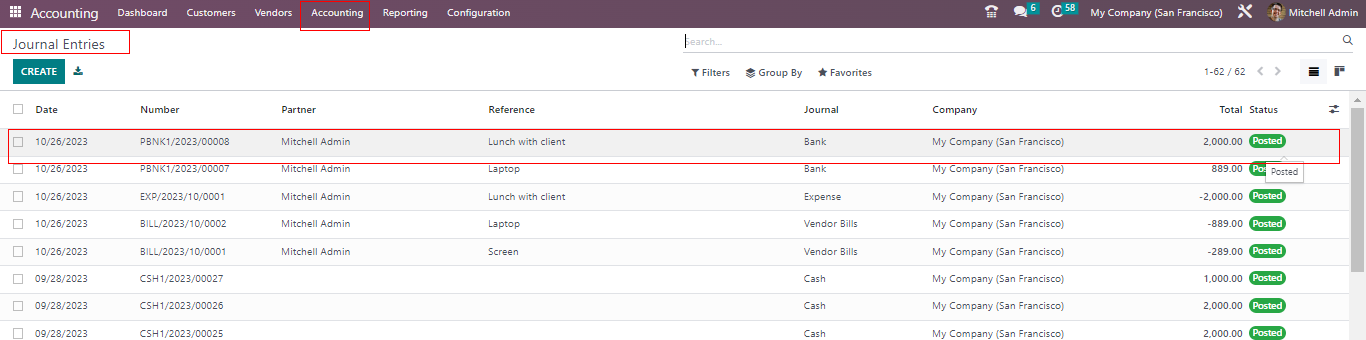
To see the journal entry in the Accounting module , head to the Journal Entries section in the Accounting tab. You can find the journal entry you are looking for by checking the list of journal entries in the Accounting module. This is how you can track and view the financial record related to the expense.

When you open the journal entry , you can see which accounts are affected. In this case , the Expense Account is debited , which means the expense amount increases , so it is recorded as a debit. The Outstanding Payment Amount is credited because the company’s liability decreases as they pay the expense , and that’s why it is shown as a credit. This helps maintain the financial and record the expense accurately.
You will find a helpful section called Payment . Click on it. In this section , you can make a payment for the expense amount. This is where you can settle the payment for the expense you have recorded.
Case 2 : Paid by Employee
In the second case , when an employee spends money , the company needs to reimburse the employee. Sometimes , the employee might use their own money to get tasks done for a customer , and in such cases , the company refunds the amount to the employee , or they can include it in the employee’s next paycheck.
Now , let’s see how the company pays the money back to the employee. You can set up a special journal to handle these Employee Expenses. To do this , go to the Configuration tab, choose Settings again , add the journal name , and save it. This helps you manage and track reimbursements to employees more effectively.
Let’s create a new expense for the employee Lunch with a Client . We were using the category we set up earlier. This means the employee spent $2000 from their own pocket for a Lunch with Client added. We have also attached the receipt document using the Attached Receipt option. Now , click the Create Report button.

This process helps reimburse the employee for the $2000 they spent on the Lunch with Client. It is a way for the company to pay them back for their expenses.
Once the report is created , submit it to your manager for approval. The manager will review the report , and if everything looks good, they will give their approval. This is how the report goes through the approval process.
You can record the financial transaction of an approved expense report by posting the journal entries. These steps help make sure that the expenses are properly accounted for in the company’s financial records.
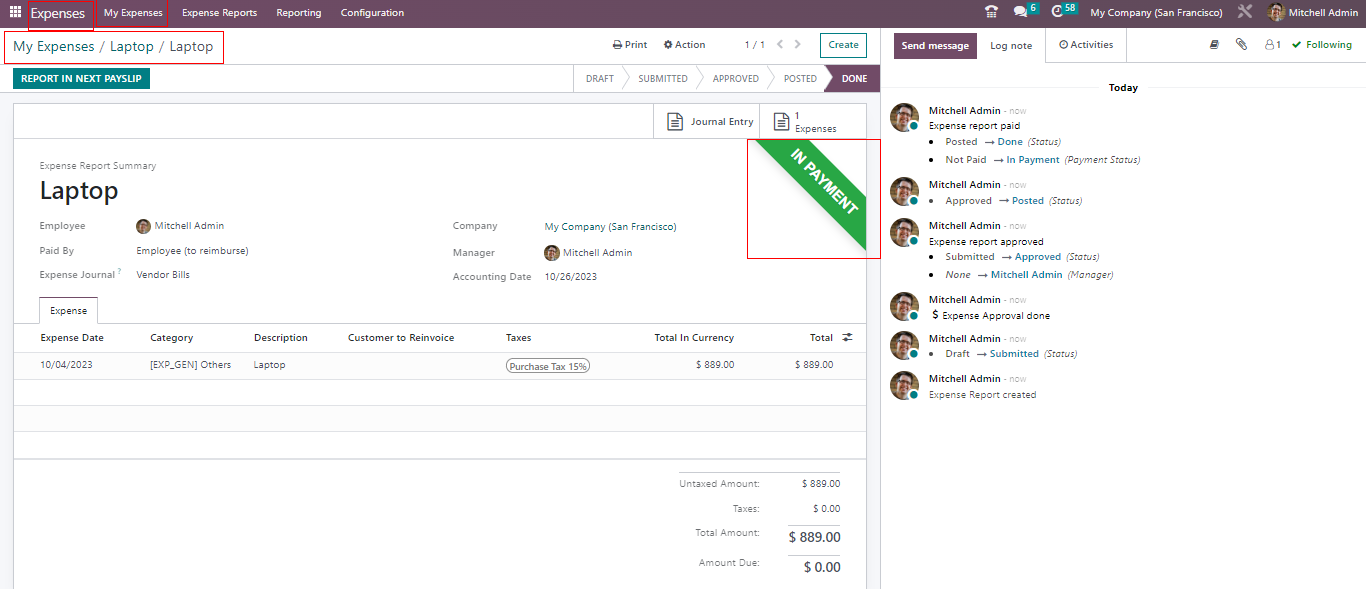
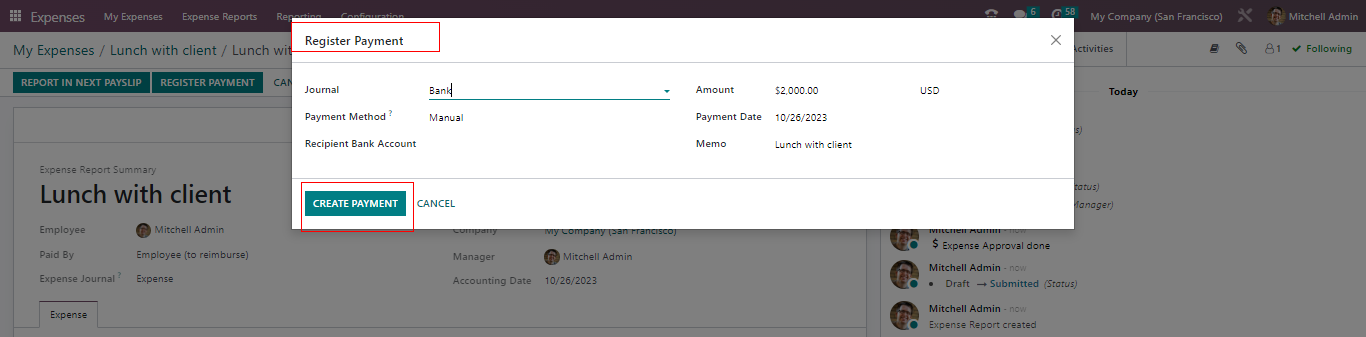
In this process , the report does not go directly to the Done stage because the employee paid for the expense. In this case, the company needs to reimburse the employee. To do this, you click on the Register Payment button. This helps initiate the reimbursement to the employee.
A new window will pop up to help you register the payment. In this window , you can choose the journal , payment method , specify the amount , and select the payment date. You can also add a description for the expenses in the Memo field. Finally , click the Create Payment button to complete the reimbursement to the employee.
After creating the payment , the expense report is moved to the Done stage. At this point , you will see a ribbon labeled Inpayment on the report. It indicates that the reimbursement has been processed and recorded. The journal used for this same one specified in the Configuration Settings, ensuring consistency in the financial records.

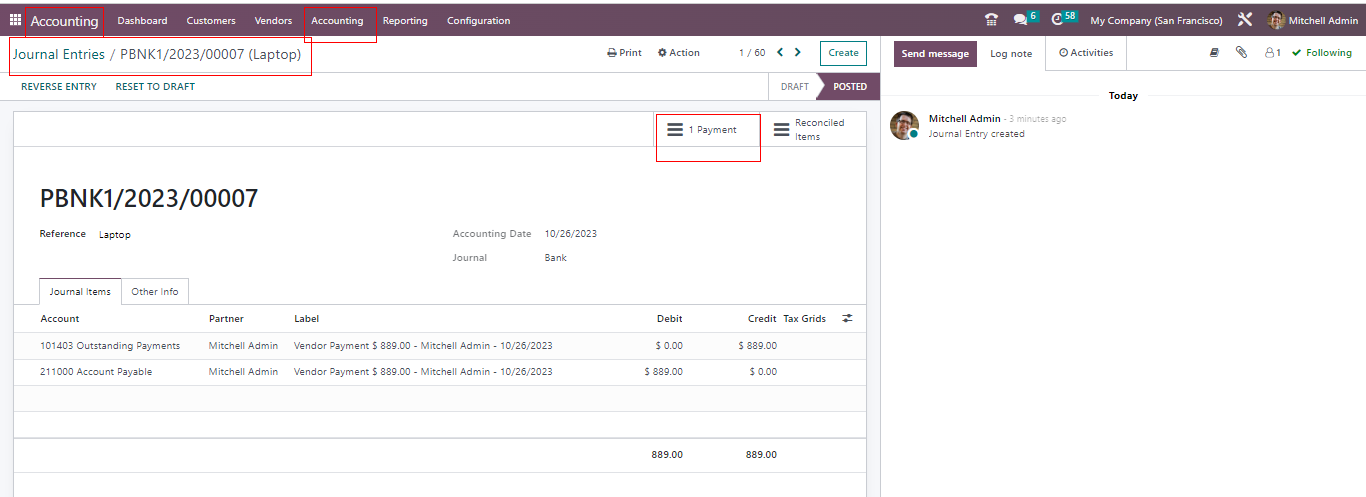
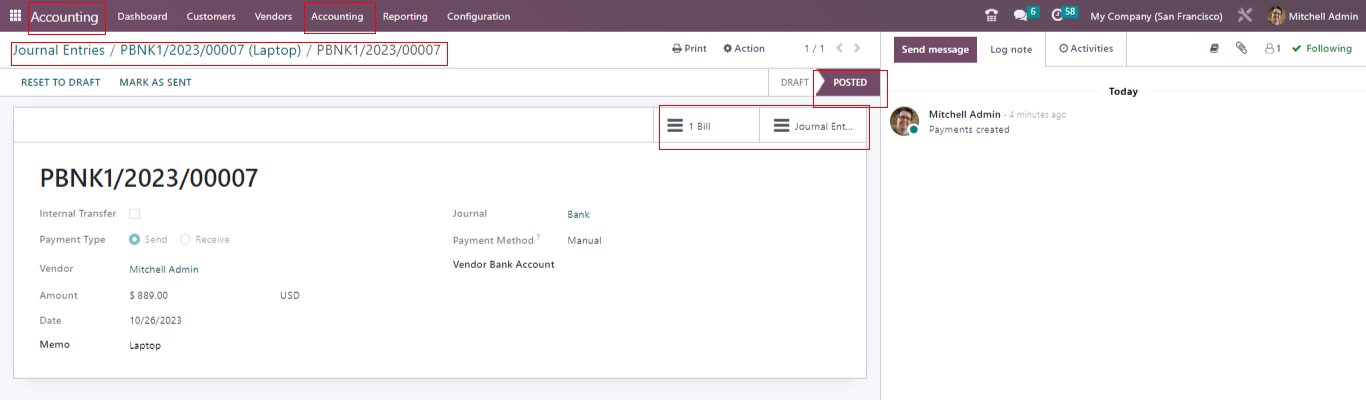
Now , let’s take a look at the journal entry in the Accounting module. You will notice that the amount appears as a negative value. This is because the company paid the employee , so it is recorded as an expense on the company’s side. Open the entry to see more details about this transaction in the financial records.
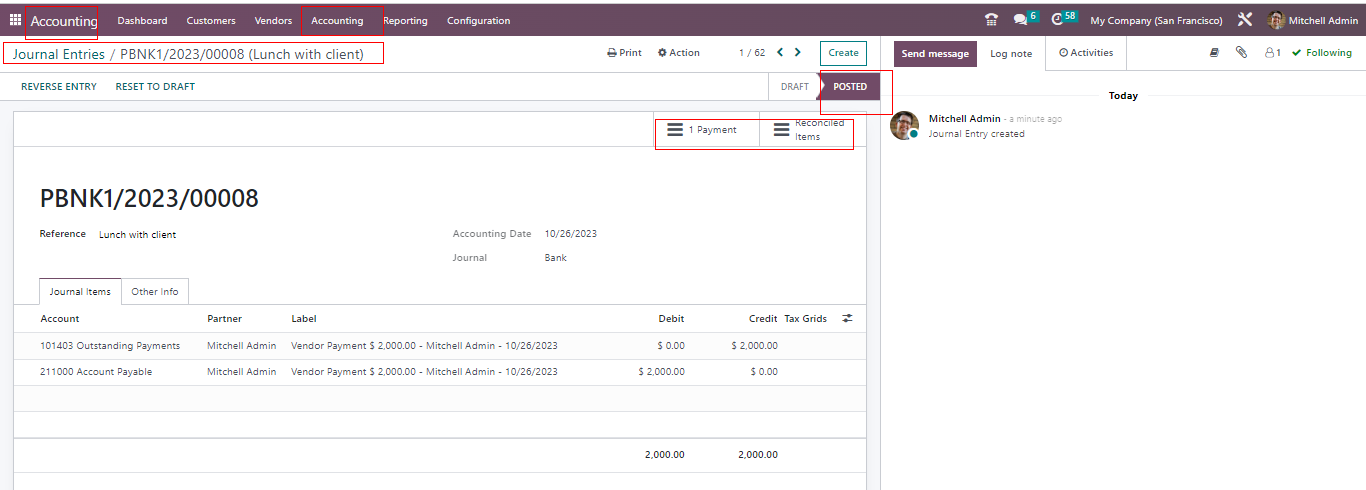
This entry acts like a bill for the employee. In the Journal Entry tab , you can see that it impacts two accounts: the Expense Account and the Account Payable. It is like a record of the company owing money to the employee , and this entry tracks that transaction.
Just like we mentioned earlier , you can also reimburse the employee through their next payslip if needed. The Odoo expense module plays a crucial role in managing expenses effectively. It simplifies accurate expense tracking and makes it easier to approve employee expenses. This tool helps the company maintain control over spending and financial management.