In the World of enterprise resource planning ( ERP) system , Odoo has been a front – runner , offering a wide range of integrated modules to streamline business processes. Among these modules , the Quality Module in Odoo 16 stands out as a powerful tool to ensure product and service quality throughout the production and delivery process. In this blog , we will explore an overview of Quality Module in Odoo 16 , highlighting its features and benefits for businesses.
What is the Quality Module in Odoo 16 ?
The Quality Modules in Odoo 16 is a tool designed to help businesses manage and maintain product quality and standards effectively. Whether you are in manufacturing distribution , or services , this module allows you to enforce quality control measures, monitor compliance , and make data – driven decisions to enhance the overall quality of your offerings.
Key Feature of the Quality Module in Odoo 16
Quality Control Checks :
Control points are like checkpoints that tell us when to check a product’s quality. To find out how to judge if a product is good , just go to the Control Points menu in the Quality Control tab.
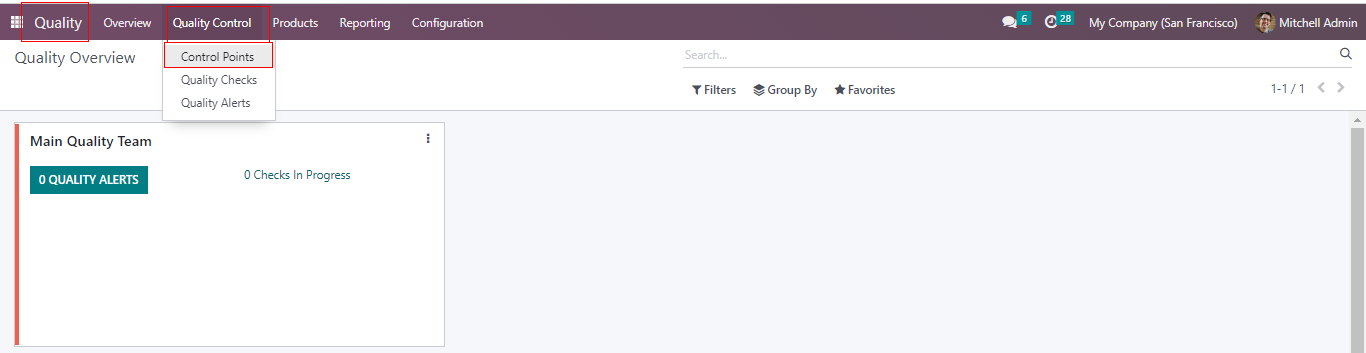
Here are the steps to create quality control points :
Title : Start by giving a title to the quality control point.
Scope : You can set quality checks for individual products , product categories , or specific operations.
Details : Include information like the company name , the quality team responsible , and the person in charge .
Instructions : Describe the specific instructions for the quality check in the instructions tab
Failure Message : If the quality check does not pass , you can specify a message that will be displayed in the Message Failure tab.
Additional Notes : Any extra information or notes can be added in the Notes tab. These steps help ensure that quality control is carried out effectively for your products or operations.
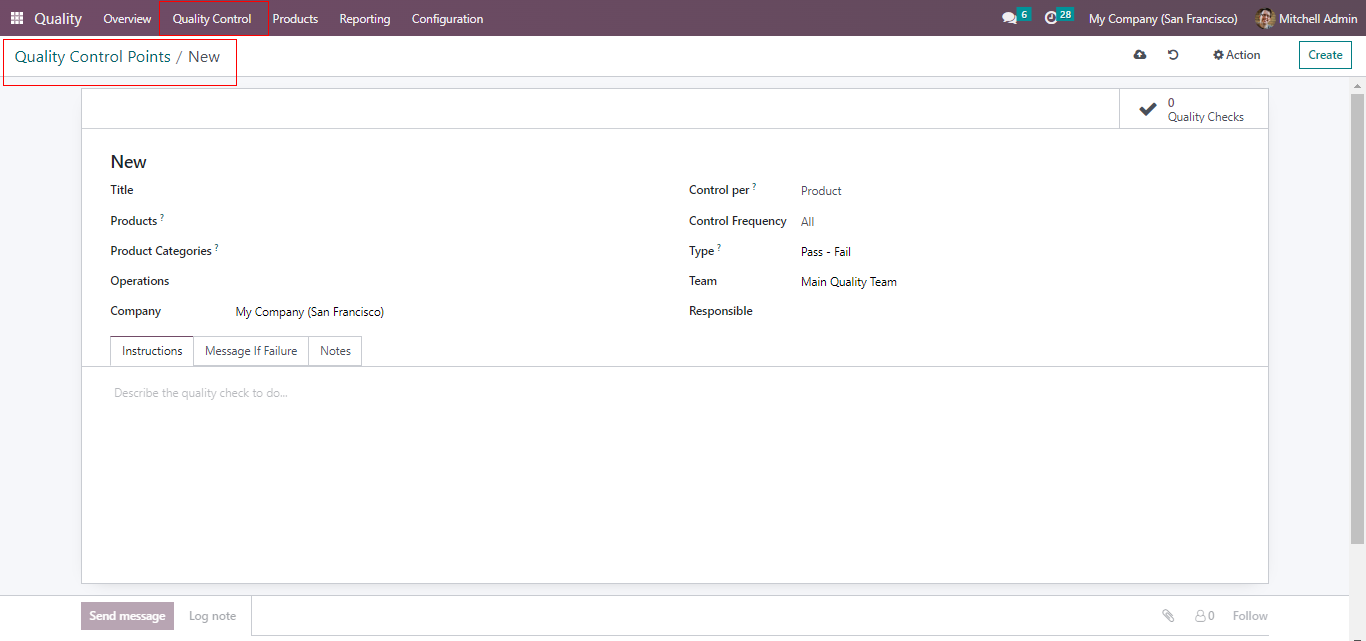
You have three options for quality control :
Per Product : When you choose this option , quality checks are performed specifically for each product.
Per Operation : If you select this , quality checks are triggered at the operation level during the production process.
Per Quantity : Opting for this means that a quality check is requested for each new quantity registered , and you can even perform a partial quality check if needed.

Various types of quality checks can be carried out, depending on the nature of the product.

In the Control Per Operation mode , quality checks occur at the operation level. This means that each time the specified operation , in this case , Return , is performed , quality checks are conducted. It is important to note that this quality check is not specific to any particular product.
Here’s an example : A Control point has been created with the Control per Operation setting. In this case , the chosen operation is Return , and the quality check type is set to Take a Picture.
What this means is that , whenever a customer returns a product , the user must take a picture to access the quality of the returned item. This quality check applies to all products within the company when the Returns operation is carried out. It is a universal quality check for this specific operation.

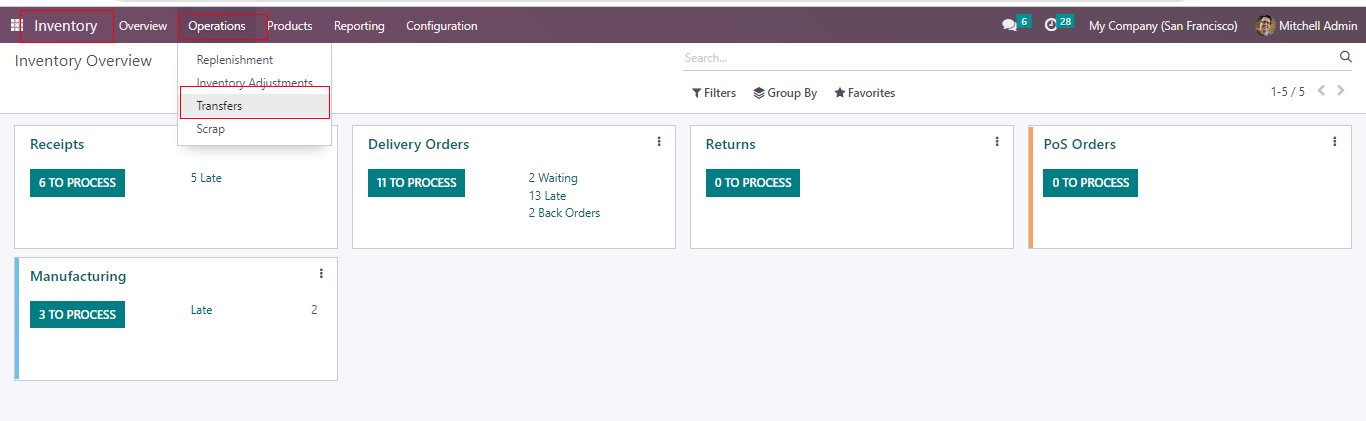
To create a Return operation , you can easily do so through the Inventory module.
Here’s simple guide :
- Navigate to the Inventory module, which can be found under the Operations tab.
- Click on the Transfer option.
Next , click on the New button. For the transfer you are creating , let’s say that a customer named Azure Interior wants to return one unit of the product Drawer . This returned product is then placed in the company’s stock location. To initiate the transfer , simply click on the Mark As TODO button.

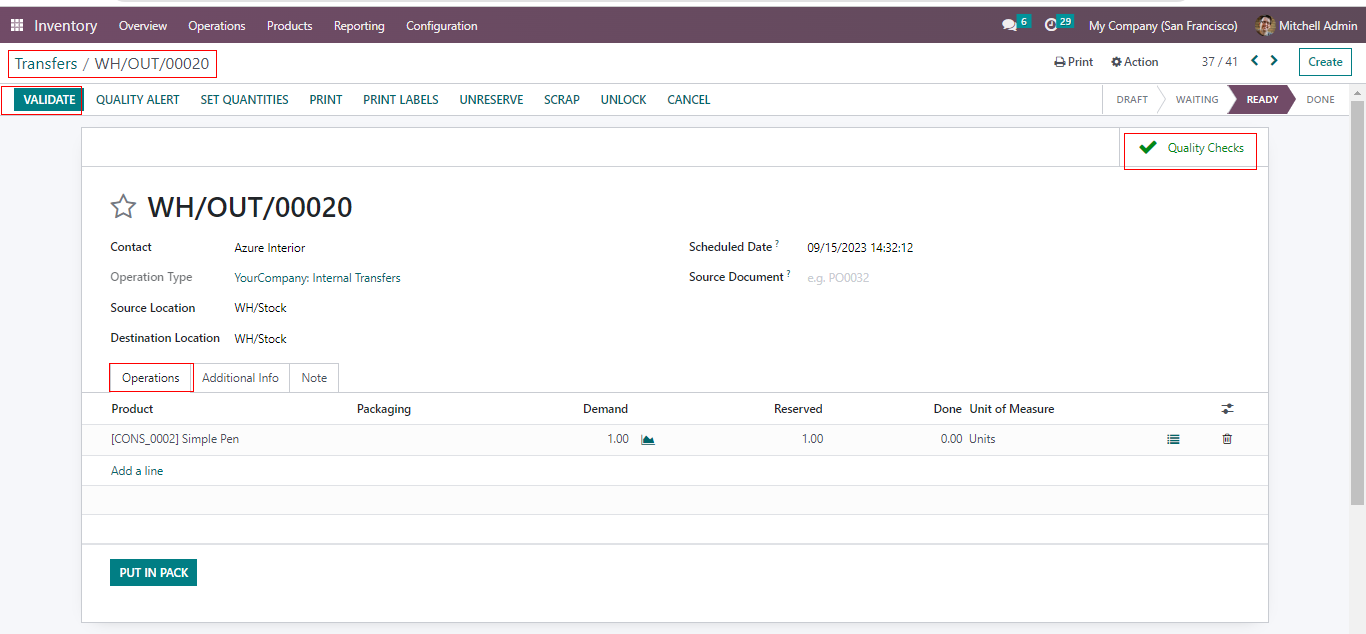
You will notice a button that allows you to assess the quality of the returned products. Click on the Quality Checks button to perform the quality assessment. It is important to note that you can only restock the product into the stock location once the quality checking process has been completed.

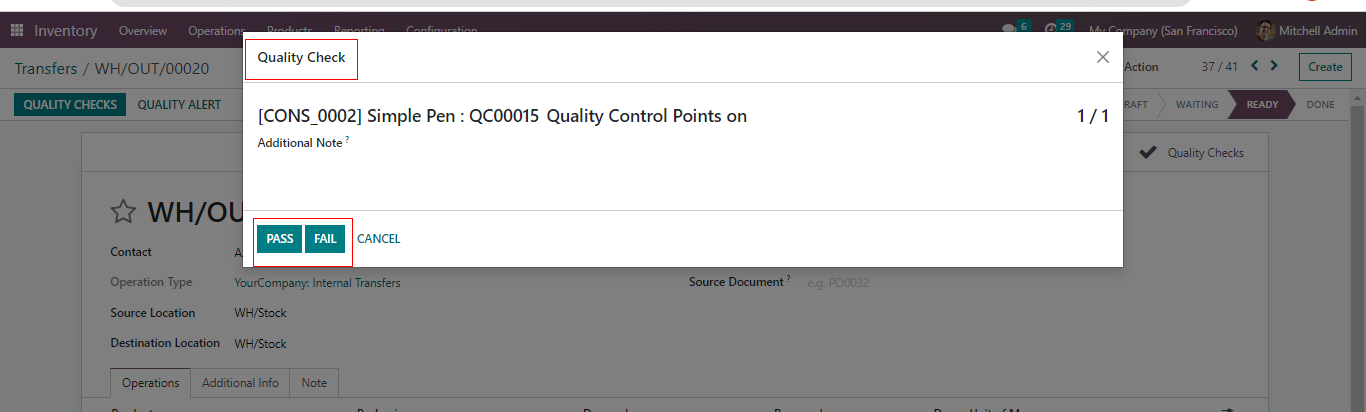
Within the popup window , you will perform the quality check. In this case , the quality checking type is Pass or Fail of the product at this stage.
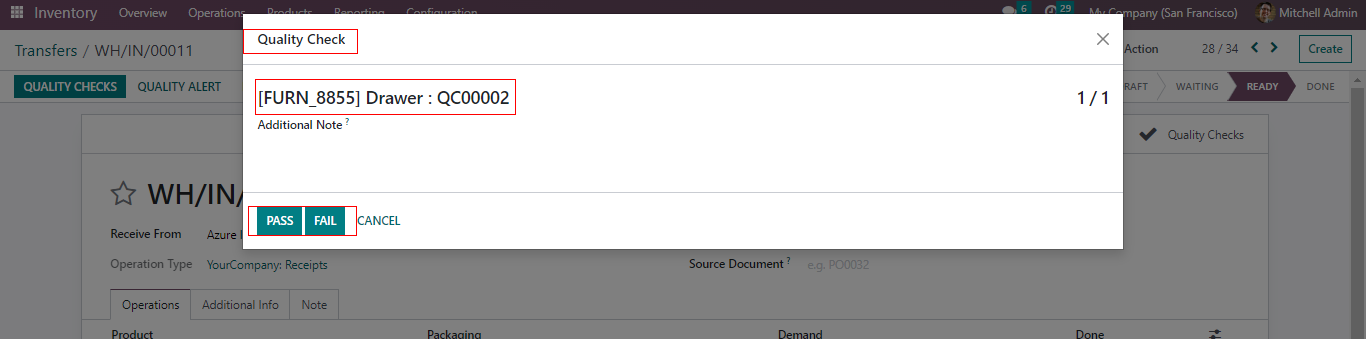
The outcome of the quality check confirms that there are no problems with the product. As a result , the user can proceed to validate the process. A smart tab labeled Quality Checks appears in green , indicating that the quality check has successfully passed.

When a customer returns a product to the company , it is essential for the user to conduct quality checks. In this scenario , the control point operates on a Per Operation basis , meaning that quality checks are performed every time a Return Operation takes place.
Now, Consider the Control Per Product approach. Here , quality checks are tied to specific products and operations. For example , a new Quality Control Point has been established for the product Simple Pen with the title Quality Control Point on established for the product Simple Pen with the title Quality Control Point on Simple Pen. Within this point , the chosen operation is Internal Transfer . This signifies that when an Internal Transfer is initiated for the mandatory quality checks specific to that product have been successfully conducted.
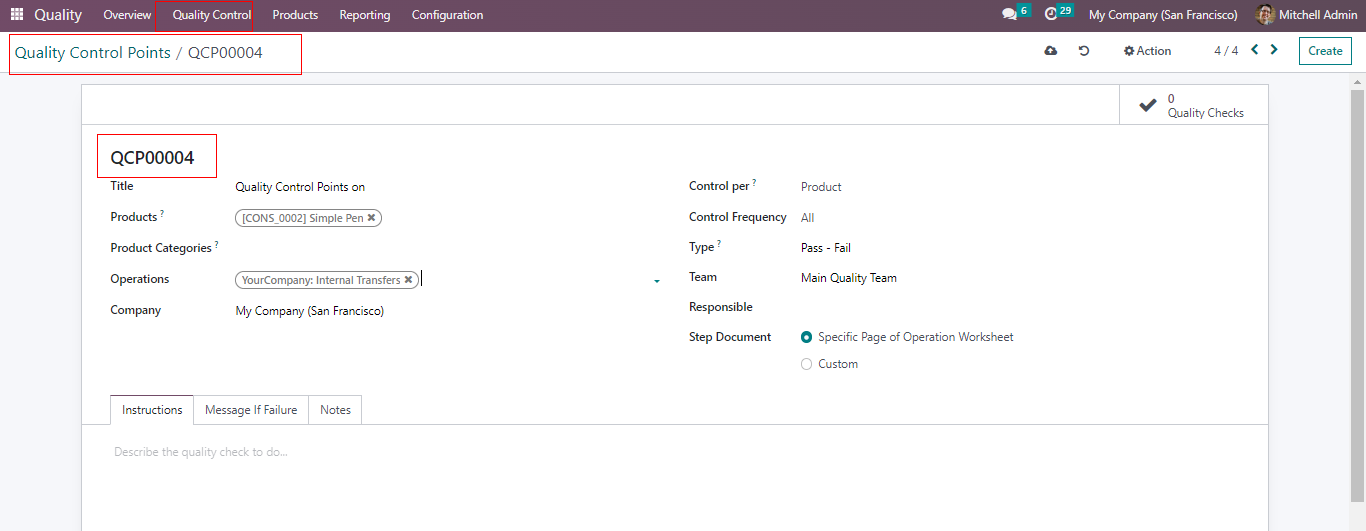
A Control Per Product approach is selected with a Control Frequency set to All . In this case , the chosen quality type is Instruction , allowing you to input specific instructions in the designated tab. After configuring these settings, remember to save the control point.
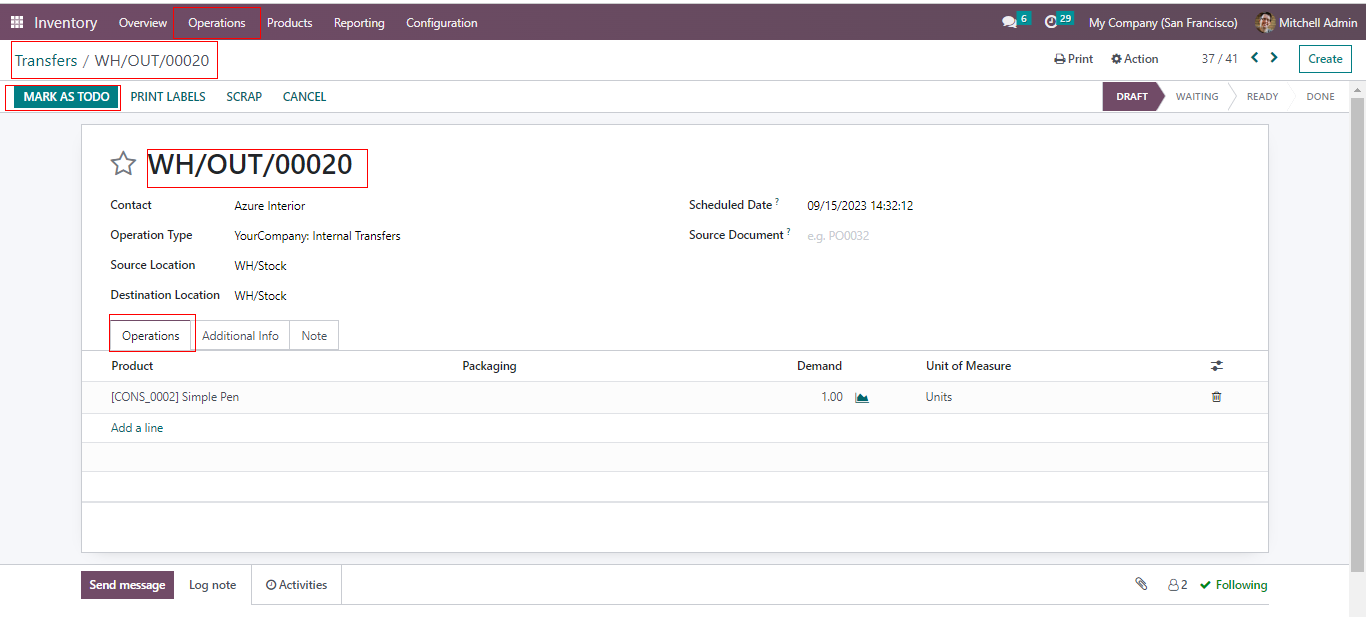
Now , to create a new internal transfer for this particular product , follow these steps :
- Go to the Inventory module.
- Select the Transfers option from the Operations tab.
- In the Transfers section, click on New.
In the internal transfer process you are setting up, the product is to be moved from the Stock location to This operation is categorized as an Internal Transfer. You will specify that you want to move two quantities of Simple pen within the Operation tab. To initiate the transfer , simply click on the Mark As TODO button.
The transfer process proceeds directly from the Draft stage to the Ready stage without stopping at the waiting stage. This skip occurs because the stock location already has the required quantity of the product. At this point , a new button labeled Quality Checks will appear , indicating the presence of a control point that requires quality checks.
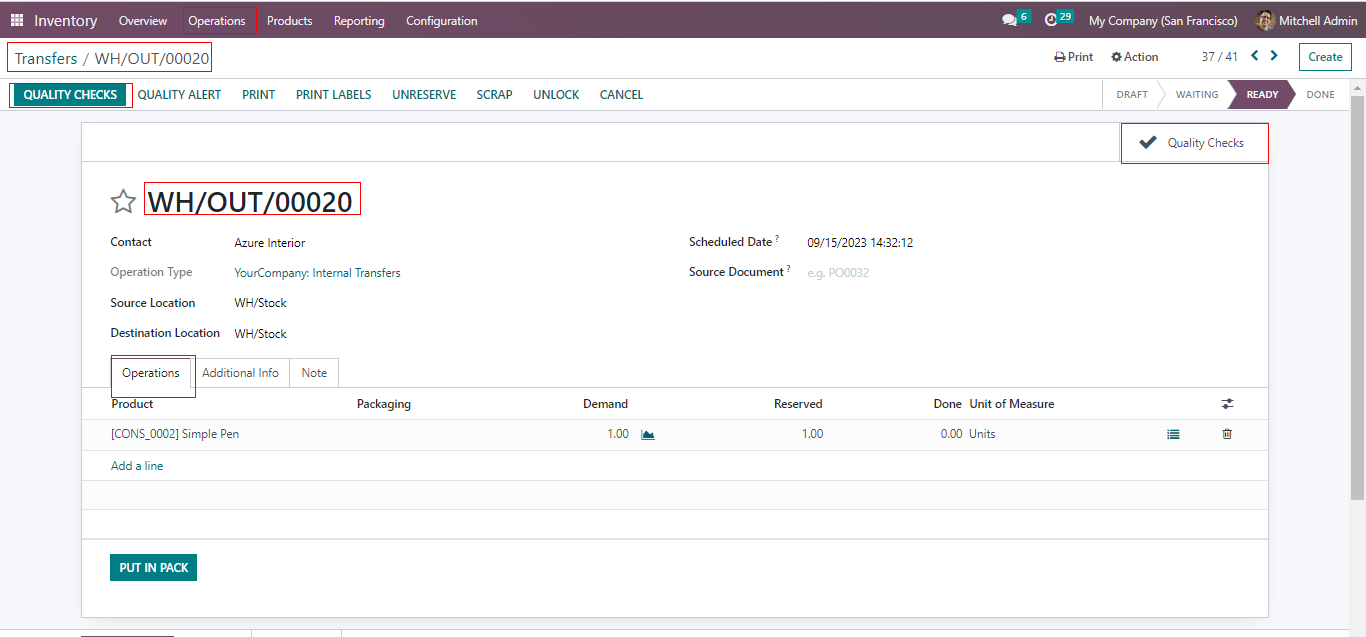
Click on the Quality Checks button to initiate the product quality assessment. A popup window will appear , displaying the same title that was provided when creating the Quality Control Point. You will also see the instructions within this window. Additionally , there is an option for the user to include any extra notes related to the quality check. Once everything is in order, click the pass button to confirm the quality check.
With the completion of the quality check , the Quality Checks smart tab changes its color to green. This signifies that the quality check has passed successfully. At this point , the user is free to proceed and finalize the transfer.
In the context of this Control Point , the setting is Control Per Product , which means that this specific quality check only occurs when there is an internal transfer of the Simple pen.
Now, let’s talk about Control Per Quantity. In this type , quality checks are performed on each individual quantity of a product. Sometimes , the user may need to assess the entire quantity to evaluate quality , while in other cases , only a percentage of the total quantity may undergo quality checks to represent the overall product quality.
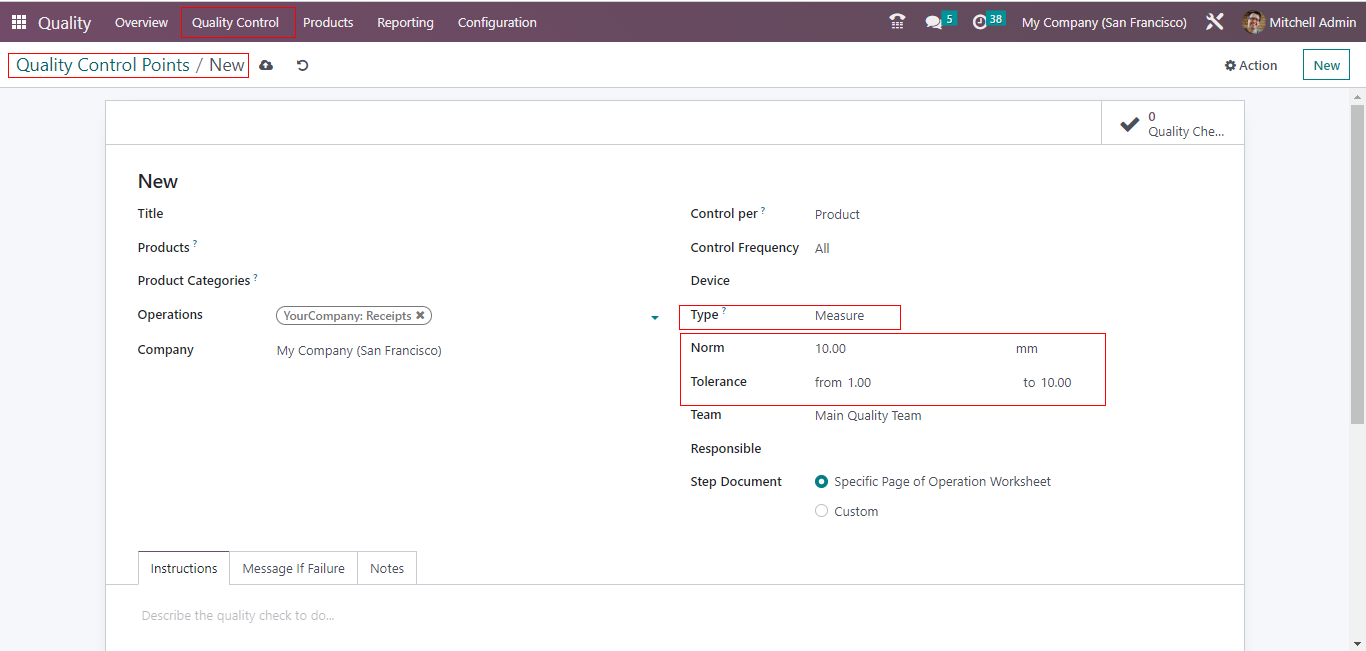
For instance , a control point has been established for the operation Receipt , and it is configured as Control Per Quantity. In this scenario , every single quantity of the received items must undergo quality checks.

When Control Per Quantity is selected , an additional option becomes available : Partial Transfer Test. If this option is disabled , it means that every individual quantity of received goods must undergo quality checks.
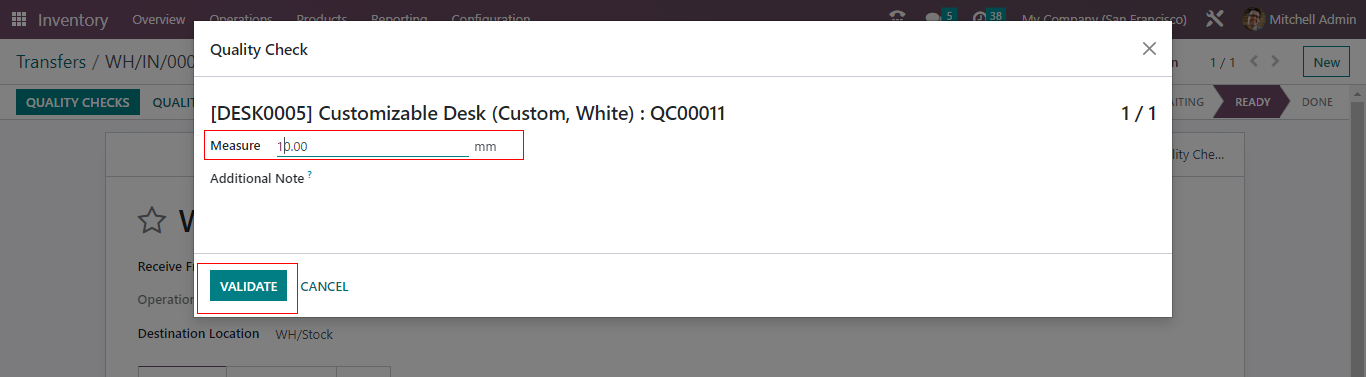
In this case , the quality check type chosen is Measure. This involves setting up measurements such as Norm and Tolerance. To pass the quality checks , the measurements of the received goods must fall within the specified tolerance range.
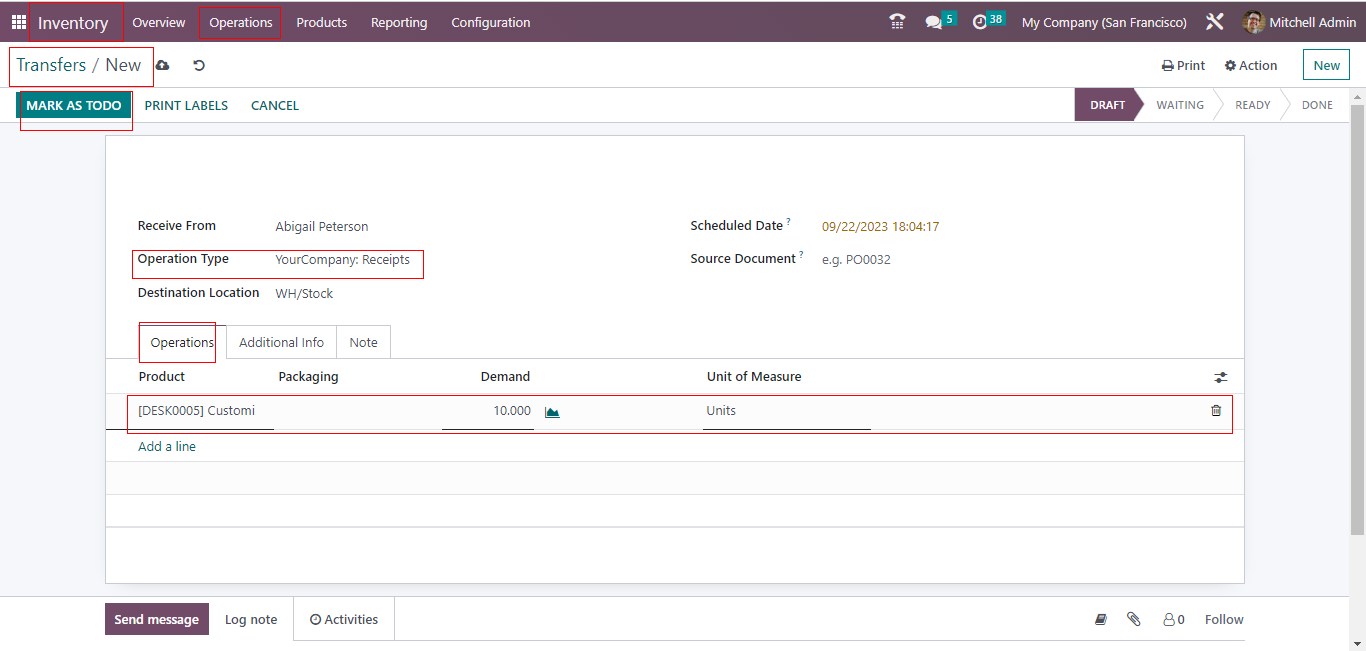
Now , to create a new receipt , follow these steps :
- Go to the inventory module once again.
- Select the Transfers option.
- Create a receipt from the Vendor Abigail Peterson , involving 10 quantities of the product Customizable Desk
- Click on the Mark As TODO button to initiate the receipt process.
The product is traceable , and of the 10 quantities , a lot number has been assigned. Prior to validation , make sure to perform the quality checks.
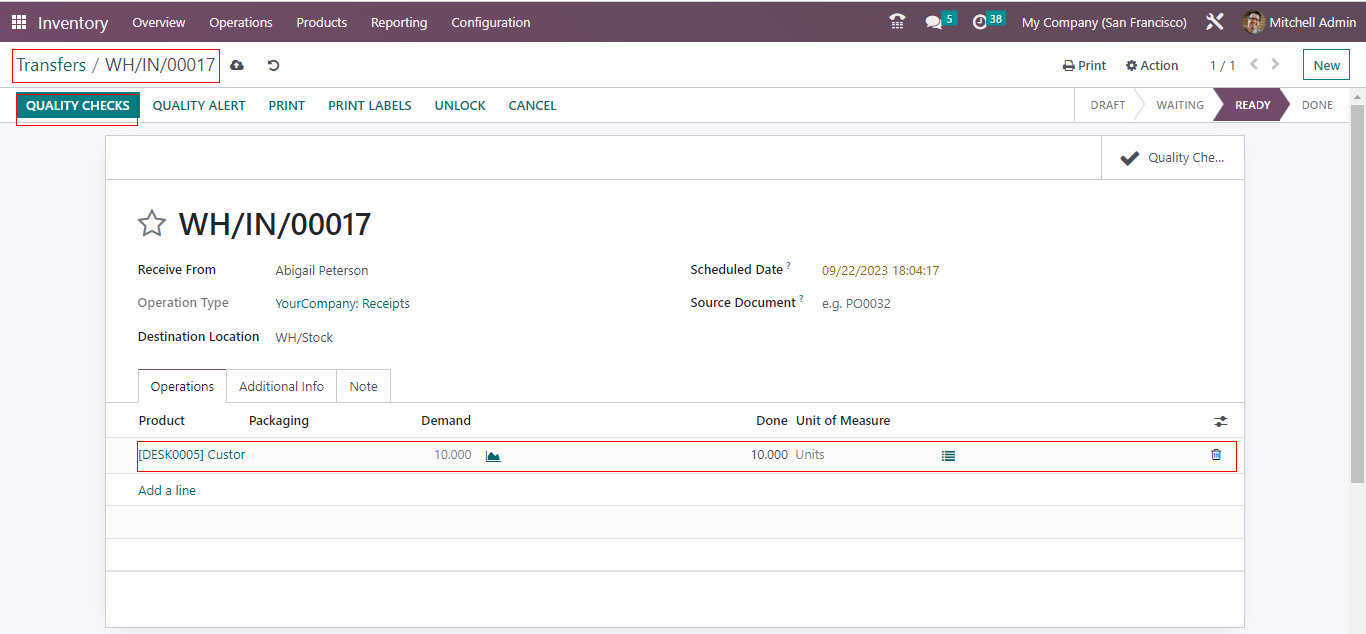
In this context , with a quantity of 10 , you should enter a measurement that falls within the range of 01 to 10.Afterward , proceed to validate the quality checks.
You can now proceed to validate the receipt. Look for green check marks that will appear within the operations tab once the validation is complete.

In certain situations , it is not necessary to inspect the entire quantity of received goods to assess their quality. In such cases , the Partial Transfer Test option is enabled within the same quality control point.
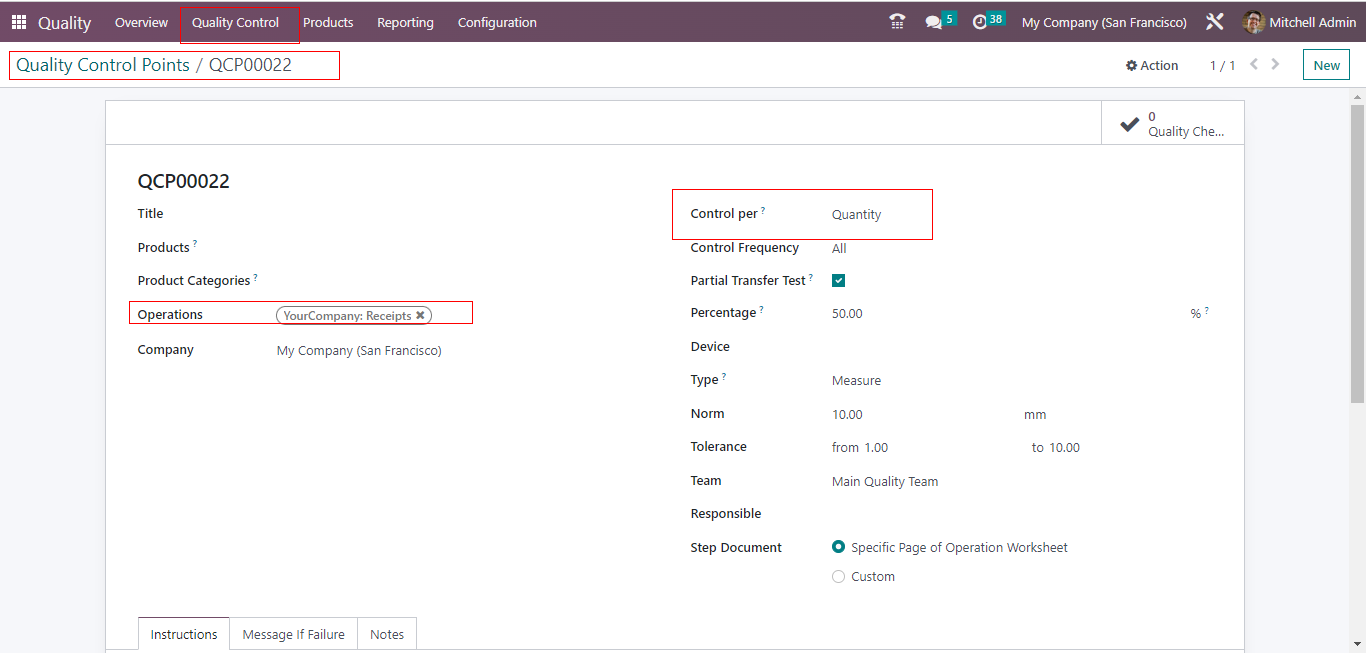
Upon enabling the Partial Transfer Test , an additional field called Percentage becomes visible. Here , a value of 50 % has been entered. This signifies that only 50 % of the total quantity needs to undergo quality checks to evaluate the product’s quality.

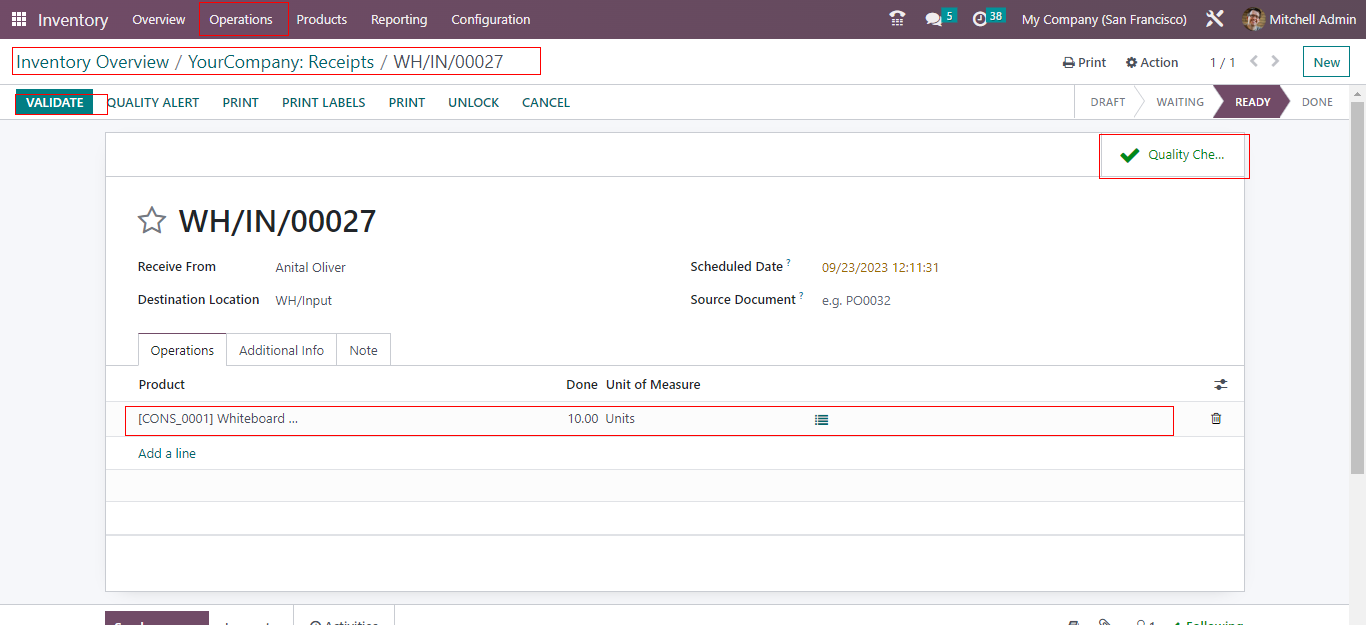
Now , let’s recreate the same receipt process. Choose Anita oliver as the vendor and select abc quantities of the product Whiteboard pen .
Once you have made these selections , click on the Mark As TODO button. The 10 quantities of Customizable Desk is now in the process. To proceed , click on the Quality Checks button.

In this scenario, even though the total quantity is 10, there’s an additional field specifying that the quantity to be tested is 5, which represents 50% of the total quantity. This means the user only needs to inspect a portion of the quantities to fulfill the quality checks.
Now , proceed to add the Quantity tested. In this case , only a portion of the quantity is entered for testing , representing the partial inspection. After entering the quantity , validate it to conclude the quality checks.
It’s important to note that even though only 00 out of the 00 quantities were checked , the entire quantity has successfully passed the quality check. With this, you can now finalize and complete the Receipt.

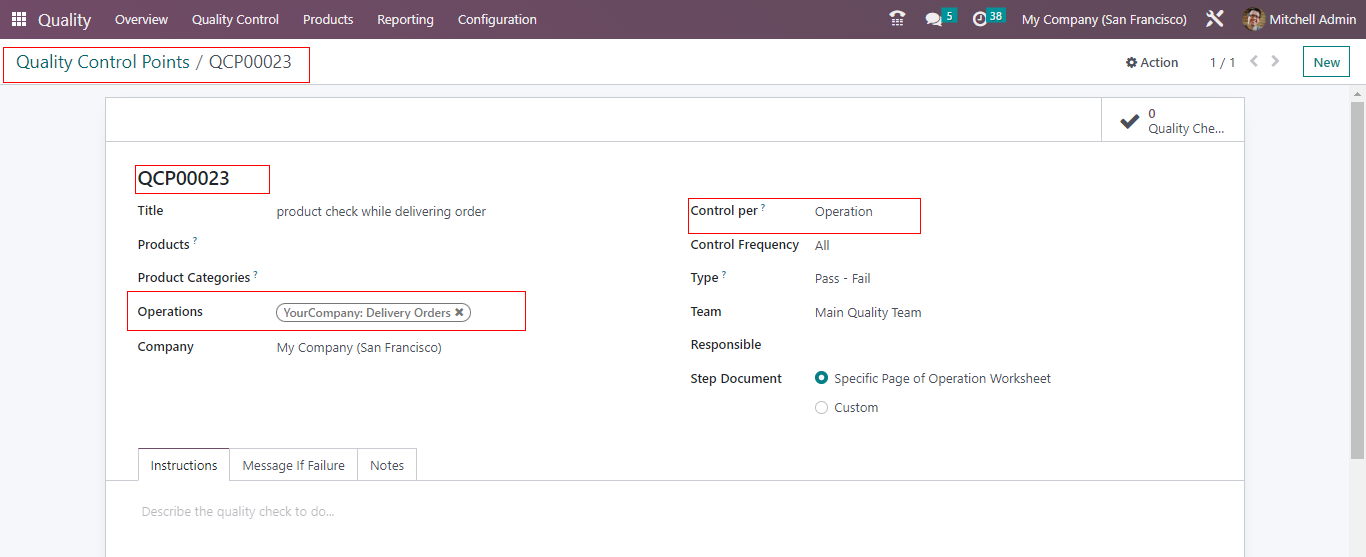
Now , let’s explore what occurs when a quality check fails. To do this , we will create another quality control point.
This new control point is titled Quality check while delivering product. And is set to operate per Operation. The specific operation designed for quality checks is Delivery , and the quality check type chosen is Pass – Fail.
Next, initiate a delivery operation through the Inventory Transfer process. In this case, the customer is Deco Addict, and the selected product is the “Large Desk.” As previously mentioned, click on “MARK AS TODO” to begin the operation. Subsequently, the “QUALITY CHECKS” button will become accessible.

A popup window will appear for quality checking, with the option to choose either “PASS” or “FAIL.” In this instance, as the product does not meet the required standards, click on the “FAIL” button.

Following the “FAIL” selection, another popup will display. This popup contains the failure message that was configured in the control point.
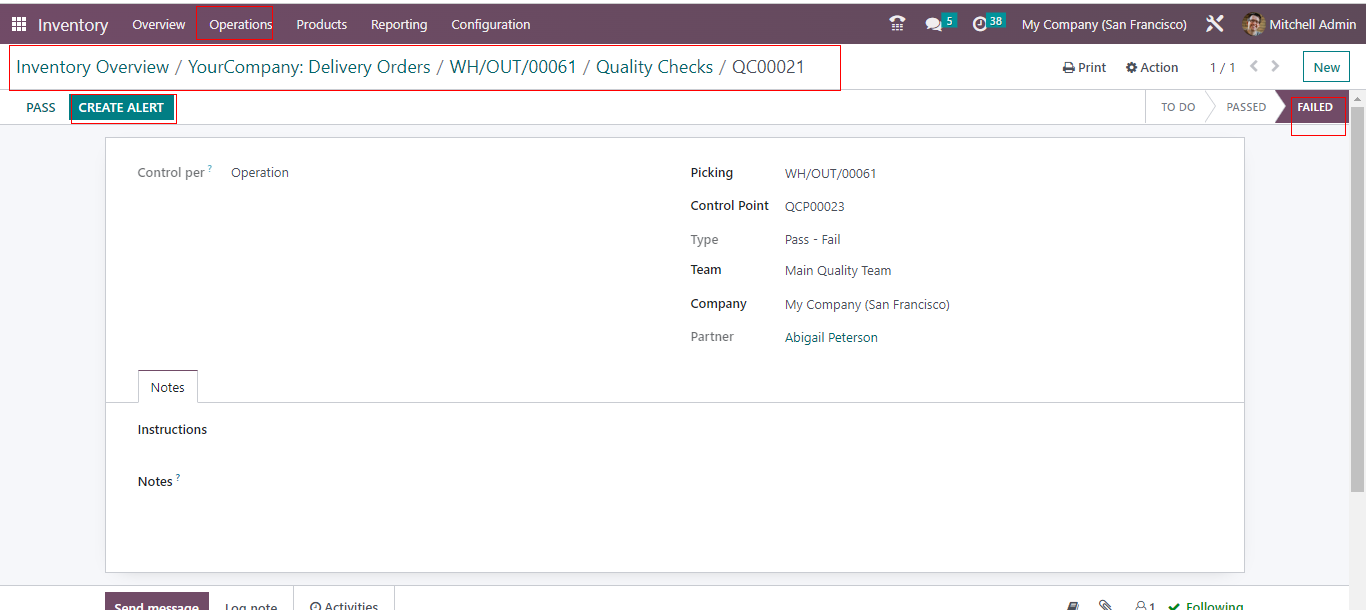
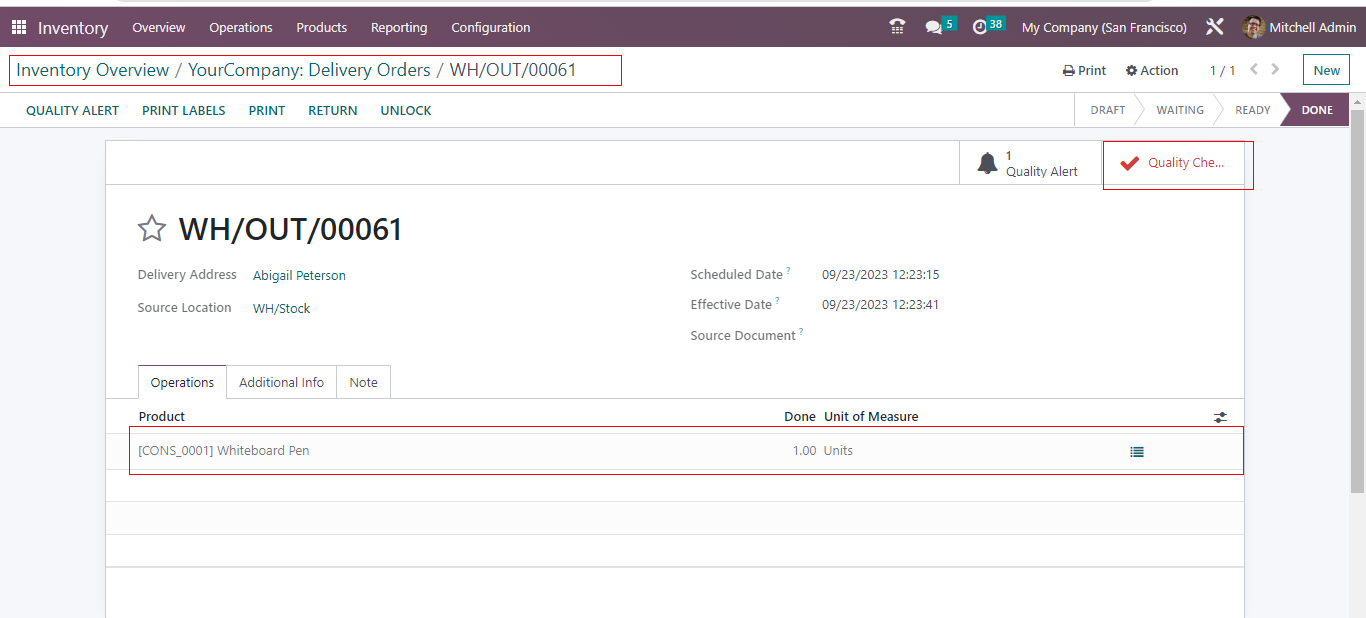
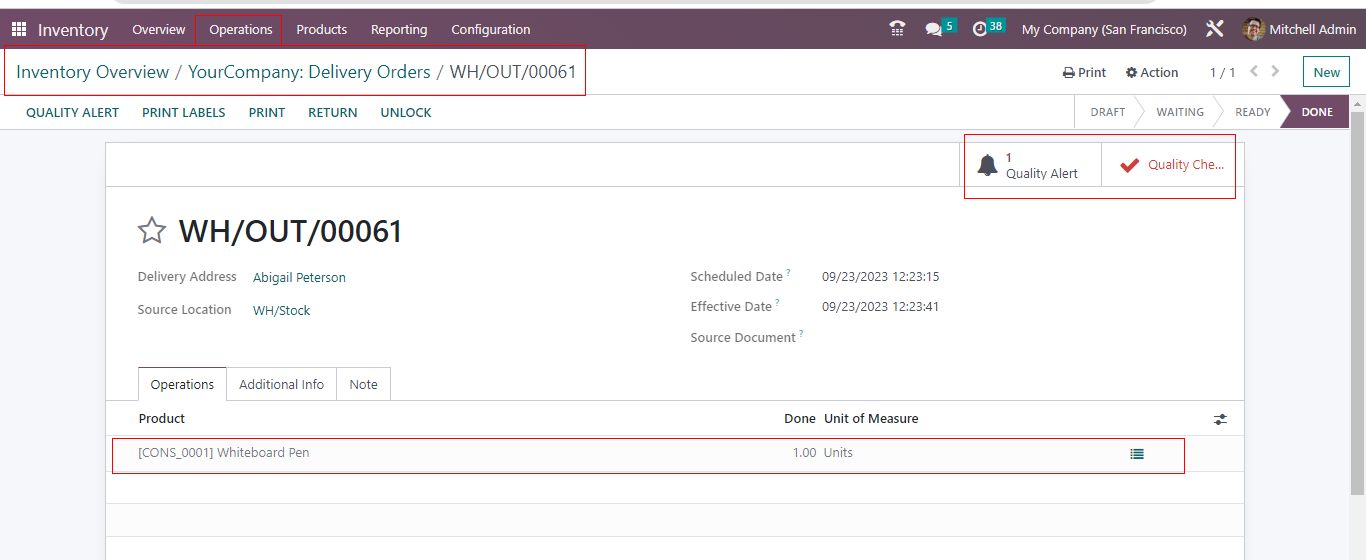
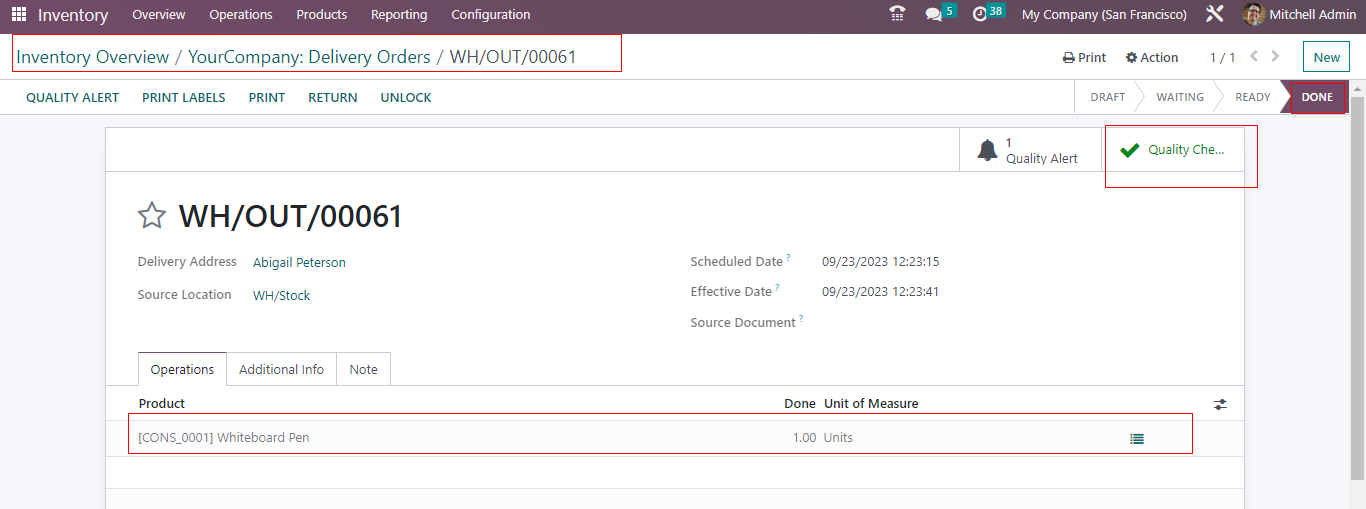
In this situation, the “Quality Checks” smart tab appears in red, indicating that the quality checks have failed. From this tab, the user has the option to create a Quality Alert.
Quality Alerts are a feature used for addressing quality issues associated with a product. When a quality issue arises, triggering a quality alert enables the company to efficiently address and resolve these issues.
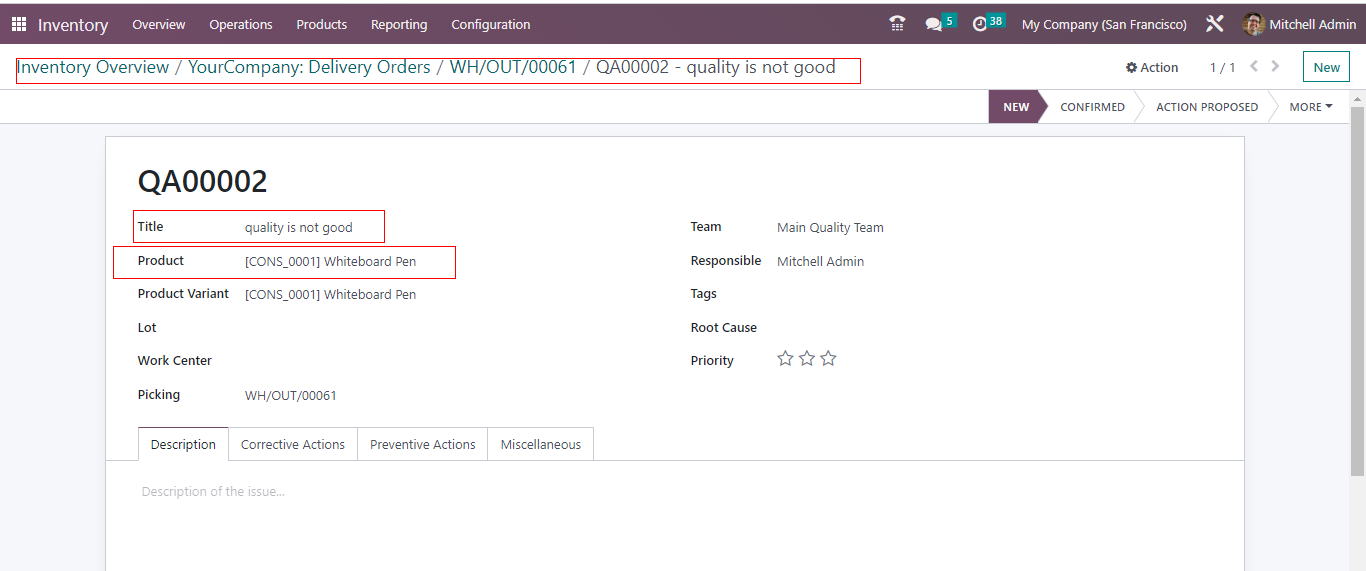
To continue from the previous transfer process, click on the “QUALITY ALERT” button. This will allow you to create a quality alert.
Inside the quality alert, you can specify a title for the alert and select the relevant product. The delivery sequence number is automatically added in the picking field. In the “Root Cause” field, you can choose the reason for the quality check failure. Additionally, you have the opportunity to provide details for “Corrective Action” and “Preventive Action” in their respective tabs. Once all the necessary information is added, the alert can be created to initiate the resolution process.
Following the creation of the Quality Alert, a new smart tab labeled “Quality Alert” is added when reviewing the transfer. You can also access and view this created Quality Alert within the Quality module for further management and tracking.
Now, let’s navigate back to the Quality module. Within the Quality module, you’ll find the “Quality Control” tab, which includes sections for “Control Points,” “Quality Checks,” and “Quality Alerts.” Select “Quality Alerts” from this tab.
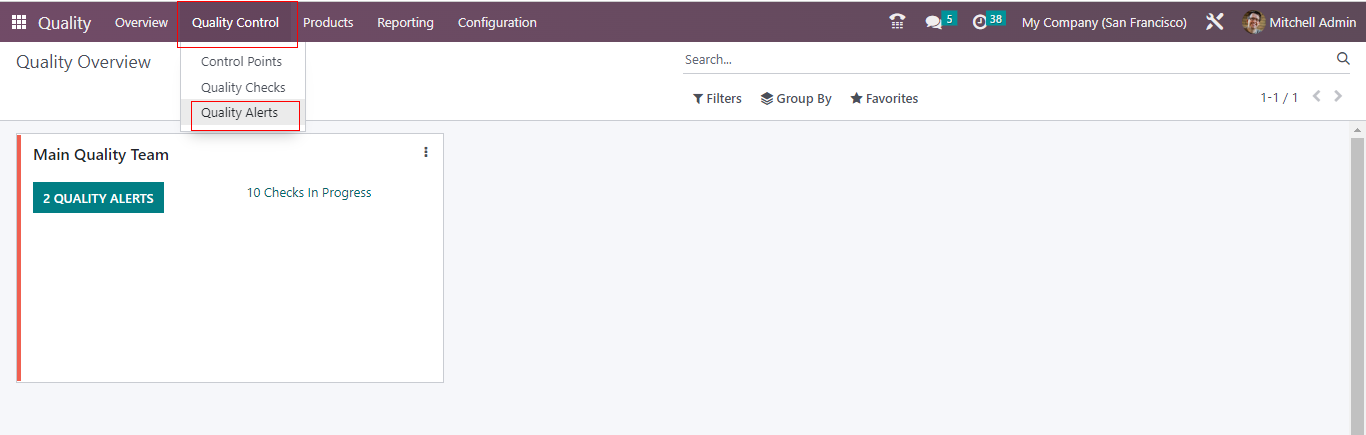
There is one Quality Alert in the New Stage.Which is the same one created inside the Transfer. Open the alert.
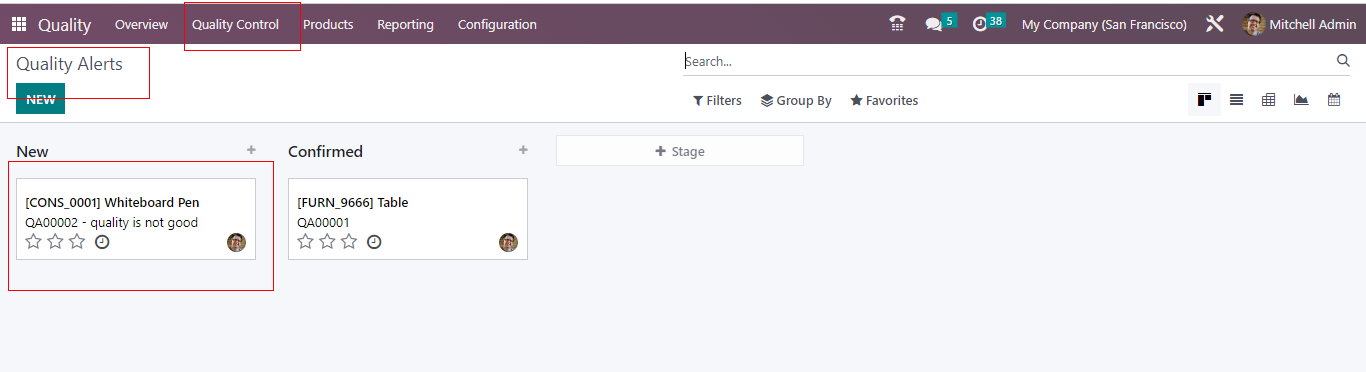
The alert includes information about the Responsible Person and the Quality Team. Currently, the alert is in the “NEW” stage, but it can progress to different stages as the quality situation evolves. If the issue is resolved, the stage can be updated to “SOLVED.”

You can access the Quality Checks from the Smart tab to perform a quality assessment. To view the quality checks, simply open the Smart tab.
When you access the quality checks, you will see a “PASS” button. Users have the option to click on this button to mark the quality checks as completed.

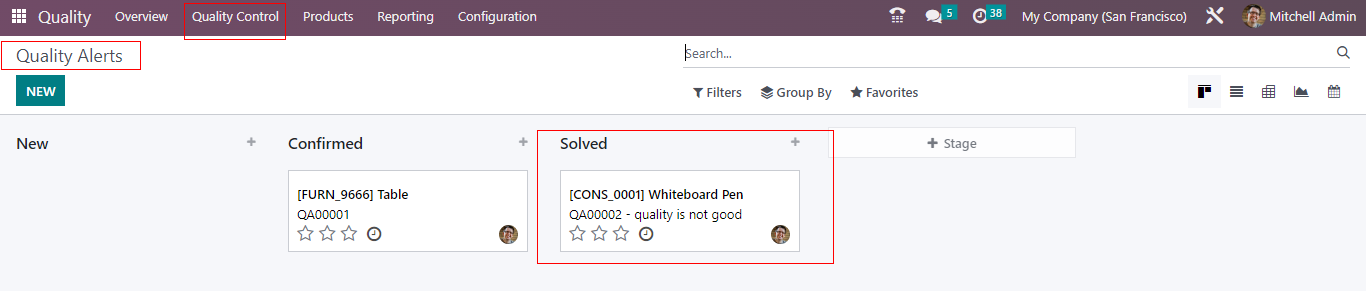
After clicking the Pass button , the stage transactions from Failed to Pass.
To return to the Transfers section , open the specific transfer. You will notice that the Smart tab is now highlighted in green , indicating that the quality checks have been successfully passed. This means the user can proceed to validate the transfer since the product is in excellent condition.
Through the utilization of the quality module in Odoo 16 , businesses can effortlessly establish and oversee quality control points. They can conduct quality assessments through multiple checks, streamlining the process of resolving issues. This not also ensures the longevity of products , ultimately boosting overall business performance.