You can establish Vendor Price Lists efficiently by utilizing the Odoo Purchase Management module. These Vendor Price Lists serve as a Valuable tool to enhance your business profitability . Essentially , the Vendor Price Lists feature allows you to set specific prices for particular products, targeted at specific customer groups , and for a defined duration. This functionality is useful when procuring goods from suppliers.
Odoo’s Vendor Price List management solution empowers you to adeptly manage supplier pricing and promotions . it simplifies the process of tracking and comparing vendor pricing , aiding and making informed purchase decisions. In this blog , we will explain to you the key components of Odoo’s Vendor Price List management tool and explore how it can streamline and optimize your procurement process.
To configure Vendor Price Lists , navigate to the Configuration tab and select the Vendor Price List option , as Screenshot below

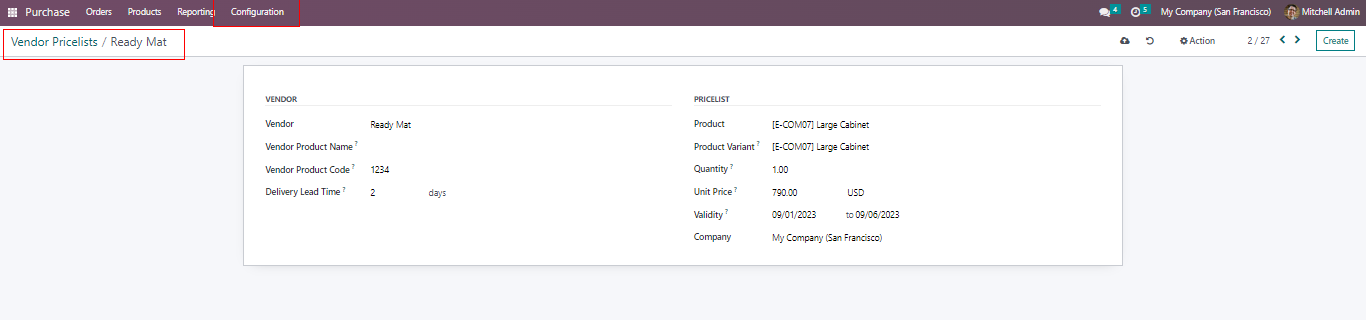
The system displays a comprehensive list of current vendor price lists , presenting key details such as the vendor’s name , subcontractor status , product name , currency used , company name , quantity , unit of measurement , and the corresponding price. You can conveniently access and view the Vendor Price List separately for each vendor and product , as shown below.
To create a Vendor Price List effectively , follow these steps:
Vendor Selection : Choose the specific vendor for whom you want to establish the price list.
Vendor Product Name :
This field allows you to specify the name of the product as it should appear on the Request for Quotation (RFQ) when sent to the vendor. If you prefer to use an internal product name , you can leave this field empty. This flexibility is crucial when the vendor uses different terminology for the product compared to Odoo’s internal product name.
Vendor Product Code :
Similar to the product name , you can designate the vendor’s product code that should be used on the RFQ. If you want to use your own internal product code , simply leave this field blank. This is important when both you and the vendor employ distinct product codes.
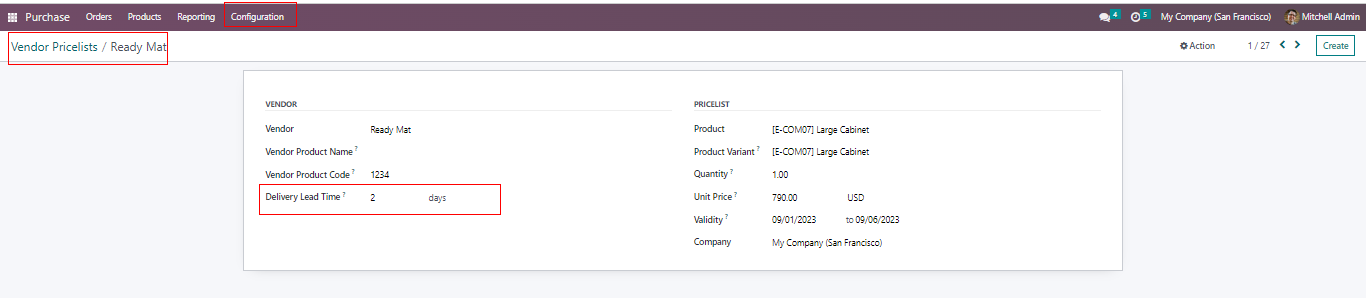
Delivery Lead Time :
Specify the number of days between the confirmation of the purchase order and the expected product delivery.
Product Selection :
Choose the specific product to which this price list should be applied.
Product Variant ( Optional ) :
If this price is applicable to a particular variant of the product, you can select it here. If it applies to all variants of the product , you can leave this field empty.
Quantity :
Indicate the quantity of goods that must be ordered to qualify for this pricing.
Unit Price :
Enter the purchasing price for the item under this price list .
Validity Period :
Mention the duration during which pricing is valid.
Company :
The company name is automatically populated , but you have the option to change it by clicking on the company line.
How Vendor Price Lists Work in Creating Purchase Orders:
Now , Let’s see how this works when creating a Purchase Order for a vendor with a set price list.
Create an RFQ :
To create a RFQ, simply click on the Create button as shown below:
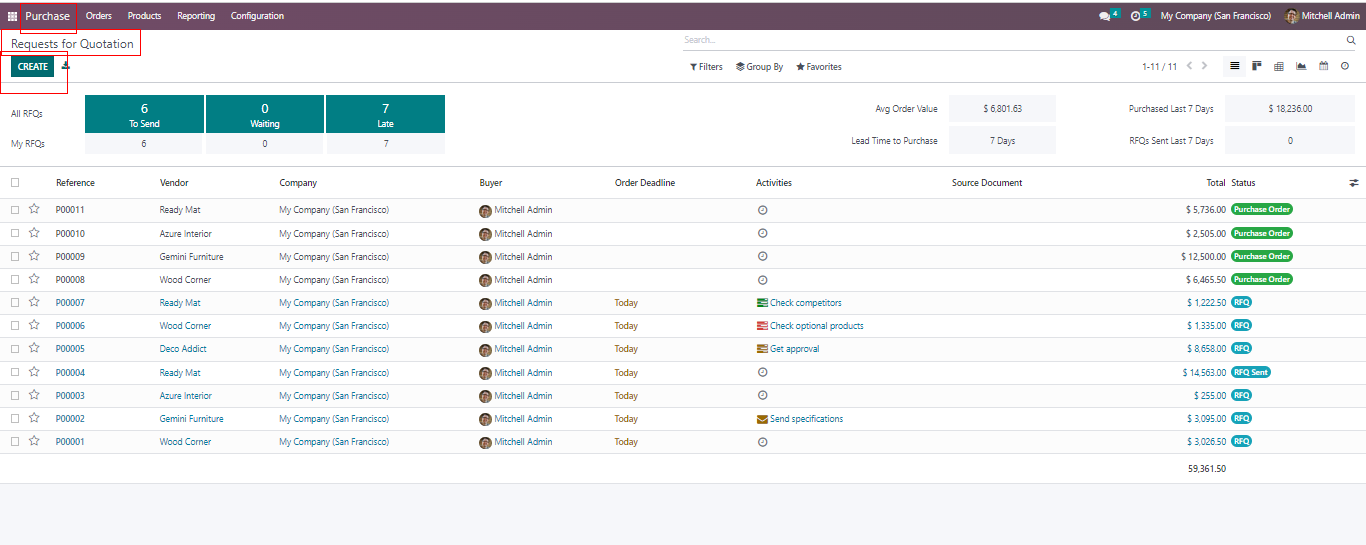
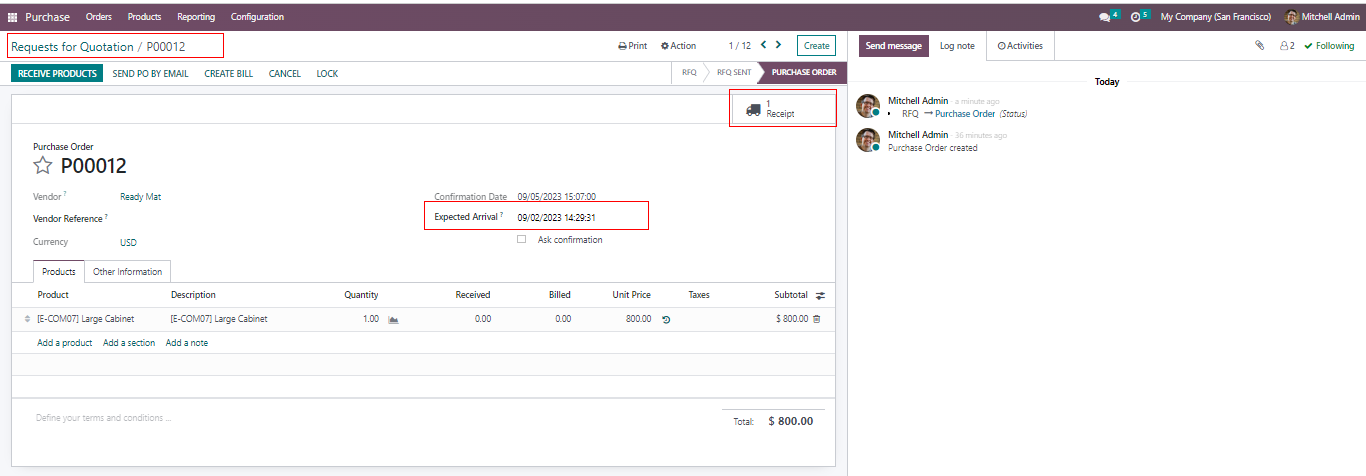
Start by creating a Request for Quotation ( RFQ) with the selected vendor ( e.g., Ready Mat) and the product ( e.g., Large Cabinet ) for which the price list has been set up. The Product’s price will automatically adjust to the price you configured in the price list ( e.g., $500).

Vendor Price List Applied :
As shown in the screenshot , the vendor price list has been applied , and the unit price is set at $500.
Now , let’s explore the concept of Vendor Lead Time and how it functions in Odoo 16.
Understanding Vendor Lead Time :
Vendor Lead Time , also known as purchase lead time , is the time it takes for a product you have ordered to be delivered to you. In Odoo 16 , you can specify the Vendor Lead Time when creating the vendor price list.
Set Vendor Lead Time :
When creating the vendor price list , you can specify the Vendor Lead Time. This determines how long it takes for the product to arrive after you place the order.
Purchase Order Example :
In the purchase order , the expected delivery date is scheduled for one day after the order deadline due to the set delivery lead time of 1 day.
Adjusting Delivery Date :
Once you validate the receipt and receive the item successfully , the scheduled delivery date will be adjusted according to the specified vendor lead time.

In Odoo 16, Vendor Price List and Vendor Lead Time is made easy by following the steps outlined above. This helps streamline your procurement process and ensures you get the right products at the right prices, delivered on time.